
You can connect your Raspberry Pi to networks in two main ways: via Ethernet or Wi-Fi. For a wired connection, simply plug an Ethernet cable into your Raspberry Pi and enable Internet Connection Sharing on your host computer. For Wi-Fi, use the ‘sudo raspi-config‘ command to enter your network details, or edit the ‘wpa_supplicant.conf’ file directly on the SD card. Always check your IP address using commands like ‘ifconfig’ or ‘hostname -I’ to verify you’re connected. Want to optimize your setup? There’s more to discover about advanced configurations.
Key Takeaways
- Connect Raspberry Pi to a Windows PC using an Ethernet cable and enable Internet Connection Sharing (ICS) for network access.
- Use ‘sudo raspi-config’ to configure WiFi settings by entering the SSID and password, ensuring the correct country code is set.
- Create a ‘wpa_supplicant.conf’ file on the SD card to allow automatic WiFi connections to multiple networks upon boot.
- Find the Raspberry Pi’s IP address using the router’s management console or the ‘hostname -I’ command in the terminal.
- Regularly check and document IP settings to prevent connectivity issues, especially if using dynamic IP addresses.
Setting Up a Wired Connection
To set up a wired connection for your Raspberry Pi, you’ll first need to gather the essential components: the Raspberry Pi, an Ethernet cable, and a Windows PC.
Connect the Raspberry Pi directly to your Windows PC using the Ethernet cable. If you’re planning to connect multiple devices, consider using a network switch. Before proceeding, verify that the Ethernet ports on both your Raspberry Pi and Windows PC are functional.
Next, head to Windows Settings, navigate to “Network & Internet,” and then select “Ethernet.” Enable Internet Connection Sharing (ICS) to allow your Raspberry Pi to access the internet through your PC’s wireless network. This setup requires you to ensure all settings are saved before proceeding. Additionally, ensure that your Raspberry Pi is configured to utilize two network interfaces, with one set for WAN and the other for LAN, as this will enhance basic Internet sharing capabilities.
Don’t forget to configure the Ethernet port as a client to your home network and verify the IP settings.
To set up a static IP on your Raspberry Pi, use the ‘ifconfig’ command to review current network settings.
Backup your existing configuration by copying the ‘dhcpcd.conf’ file, then edit it to specify a static IP address for the Ethernet interface (‘eth0’).
After making these changes, restart your Raspberry Pi. This will guarantee a stable connection, paving the way for seamless network troubleshooting in the future.
Connect Raspberry Pi to Network: Configure Wifi With Raspi-Config
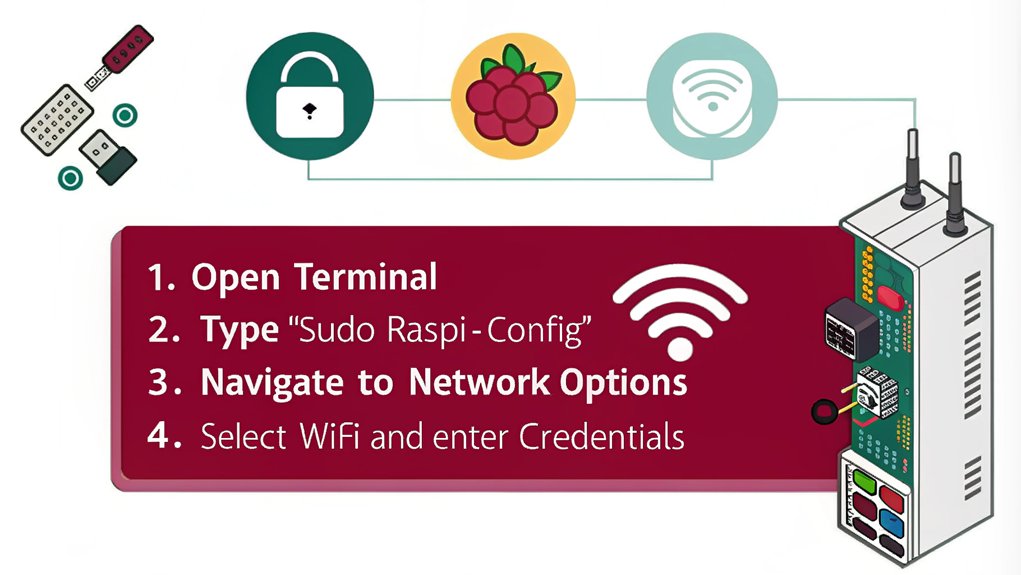
Configuring WiFi on your Raspberry Pi is a straightforward process that can be easily accomplished using the Raspi-Config tool. Start by opening the terminal and typing ‘sudo raspi-config’.
Navigate through the menu using the arrow keys until you reach “Network Options,” then select “Wi-Fi.” You’ll need to enter your WiFi network’s SSID and password. Be certain to set the correct country code to comply with local WiFi Security regulations. Additionally, ensure that your router has DHCP enabled for automatic IP assignment to your Raspberry Pi. If you encounter issues, be sure to check if your WiFi adapter is recognized by using the command ‘ifconfig’.
After entering your credentials, select “Finish” to exit Raspi-Config. You can choose to reboot your Raspberry Pi at this point, which often helps guarantee connection stability. Upon reboot, your Raspberry Pi should automatically connect to the WiFi network.
To verify your connection, you can use commands like ‘ifconfig’ or ‘iwconfig’. These commands help confirm that your WiFi adapter is recognized and that you have a stable connection.
If you encounter issues, consider temporarily connecting via Ethernet to troubleshoot or reconfigure your settings. Following these steps will guarantee you’re connected seamlessly, allowing you to enjoy the full potential of your Raspberry Pi.
Enabling WiFi via SSH
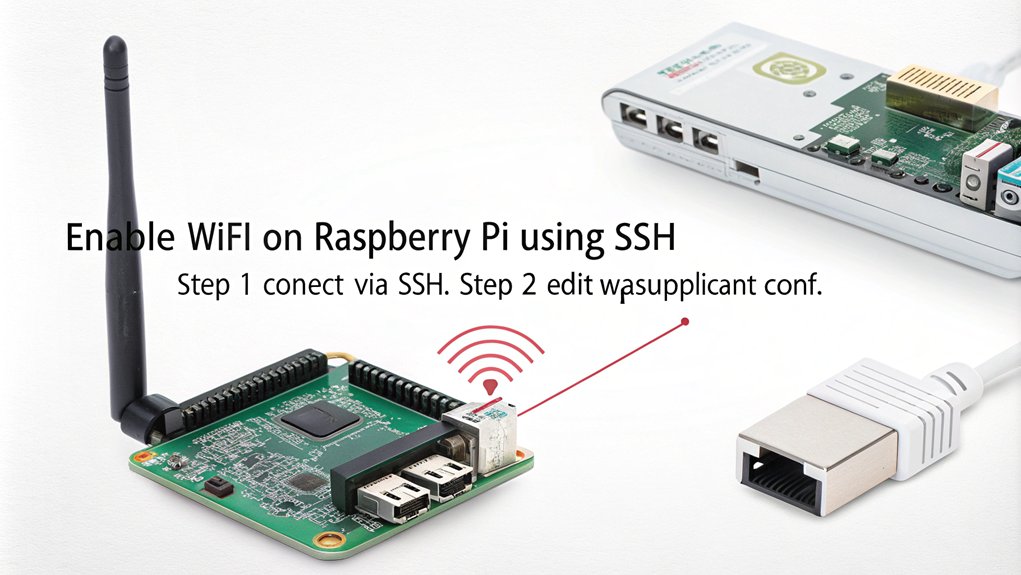
Enabling WiFi on your Raspberry Pi via SSH offers a convenient way to configure your network settings remotely. Here’s a quick guide to get you started:
| Step | Action | Notes |
|---|---|---|
| Preparation | Insert the SD card and create an empty “ssh” file | No content or extension |
| Initial Connection | Boot the Pi, connect via Ethernet, and find your IP | Use DHCP allocation table |
| SSH Access | Connect using ‘ssh pi@’ or ‘ssh pi@raspberrypi.local’ | Default credentials: pi/raspberry |
| Edit WiFi Configuration | Run ‘sudo nano /etc/wpa_supplicant/wpa_supplicant.conf’ | Add your SSID, password, and country |
| Verify Connection | Reboot the Pi, unplug Ethernet, and check with ‘ifconfig’ | Troubleshoot connections if needed |
Once you’ve made your edits, save and exit the editor to apply the changes. Enabling SSH is essential for headless operation, so guarantee your connection is safe. Additionally, having a static IP address assigned can help ensure consistent access in the future. After rebooting, test your WiFi connection by pinging a website. With these steps, you’ll be connected and ready to explore!
Using Wpa_Supplicant for Wifi
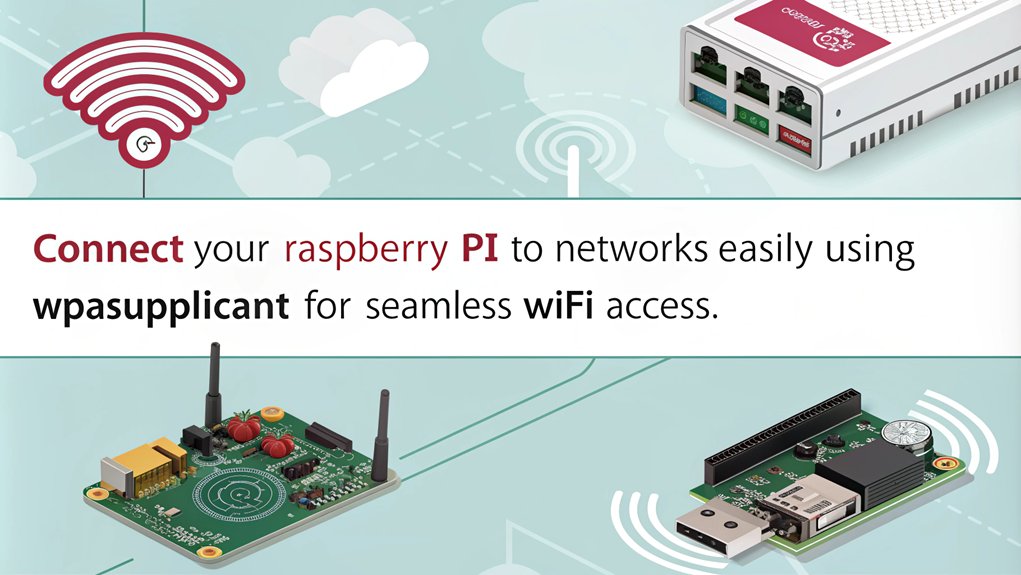
Wpa_supplicant serves as a critical tool for managing WiFi connections on your Raspberry Pi. Understanding the wpa_supplicant basics is essential for seamless connectivity. Start by creating a ‘wpa_supplicant.conf’ file and placing it in the ‘/boot’ directory of your SD card. This file should include key settings like ‘ctrl_interface=DIR=/var/run/wpa_supplicant GROUP=netdev’, ‘update_config=1’, and your network details, including the SSID and password.
Don’t forget to edit the ‘country’ field to match your location using the appropriate two-letter ISO code. Creating a wpa_supplicant.conf file is essential for headless setup without monitor or keyboard. If you want to connect to multiple WiFi networks, simply add additional ‘network={}’ blocks in your config file. Wpa_supplicant automatically selects the strongest signal, ensuring you’re always connected to the best available network. For enhanced network security, make sure to include the correct passphrase in each block. Additionally, the repository contains essential configuration files that aid in the setup process.
Once you’ve edited and saved your configuration file, reboot your Raspberry Pi. This will apply the new WiFi settings, allowing you to access your device and feel more connected to your tech community. With wpa_supplicant, managing your Raspberry Pi’s WiFi becomes straightforward and reliable.
Finding the Raspberry Pi’s IP
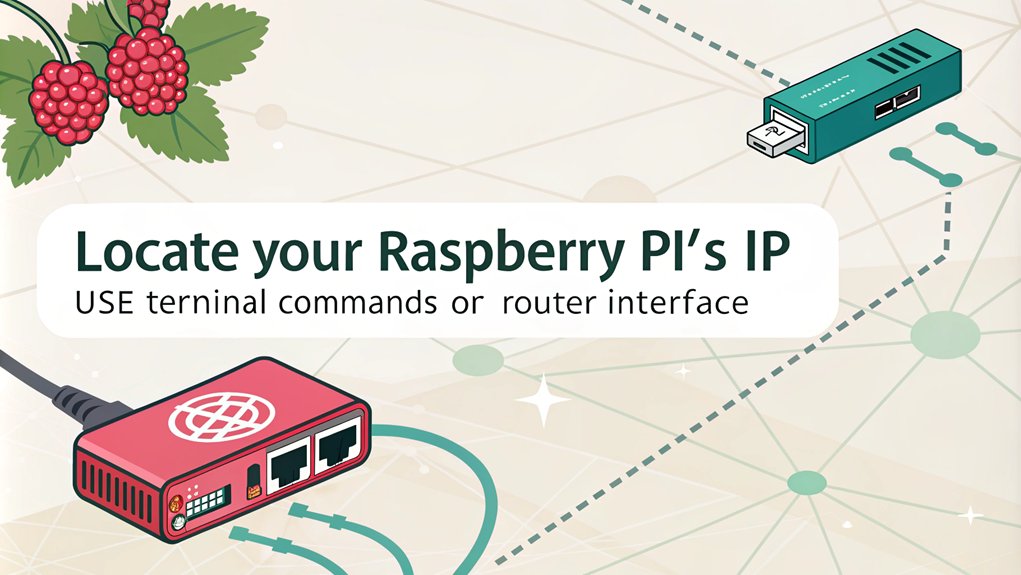
To find your Raspberry Pi’s IP address, you have a few solid options. You can check your router’s management console, use the nmap command for a quick scan, or directly connect to the Pi and run a command in the terminal. Each method offers a straightforward way to access your device on the network. Additionally, using the command ‘hostname -I’ in the terminal will provide you with the current IP address of your Raspberry Pi directly. Moreover, scanning for Raspberry Pi MAC addresses can help you identify your device if it’s connected to the network.
Router Management Console
How can you find the IP address of your Raspberry Pi? Start by accessing your router’s management console. You can usually do this by entering ‘http://192.168.1.1’ into your web browser, but the exact address may vary depending on your router model. Check the back of your router or its documentation for login credentials.
Once you log in, navigate to the section labeled “Clients” or “Connected Devices.” This page lists all devices currently on your network. Look for your Raspberry Pi, typically identified by its hostname, such as “raspberrypi” or “retropie.” The IP address will be listed next to it. Using the network icon to hover over it on your Raspberry Pi can also help you quickly check the connected network and IP address. Make a note of this address for easy access later, like for remote access or SSH connections. Additionally, you can use the command ‘hostname -I’ in the terminal to quickly find your Raspberry Pi’s IP address.
If you want to enhance your router security, consider reserving an IP address for your Raspberry Pi in the router settings. This guarantees it always uses the same IP, making it easier to find.
Finally, remember to keep your router firmware updated to protect your network from vulnerabilities. Now you’re ready to connect to your Raspberry Pi with confidence!
Using Nmap Command
If you couldn’t find the IP address of your Raspberry Pi through your router’s management console, using the Nmap command is a powerful alternative. Start by installing Nmap, which you can do easily on Linux with ‘sudo apt install nmap’. Make sure you check the installation using ‘nmap –version’. Once installed, determine your local IP address and subnet range, typically ‘192.168.1.0/24’.
Now, let’s explore host discovery. Use the command ‘sudo nmap -sP 192.168.1.0/24’ to scan your network. This basic command allows you to list all active hosts. To filter out your Raspberry Pi, apply Nmap options with the command:
”’bash
sudo nmap -sP 192.168.1.0/24 | awk ‘/^Nmap/{ip=$NF}/B8:27:EB/{print ip}’
”’
This command syntax enables you to extract the IP address associated with the Raspberry Pi’s MAC address prefix.In this case, connecting Raspberry Pi to network requires only an Ethernet cable, simplifying the setup process for headless configurations. Additionally, scanning the IP range assigned by the router or DHCP is crucial for accurately locating your device. Pay attention to Nmap’s detailed output, which can aid in troubleshooting scans and enhancing your network security. With these scanning techniques, you’ll quickly identify your Raspberry Pi on the network, ensuring seamless connectivity.
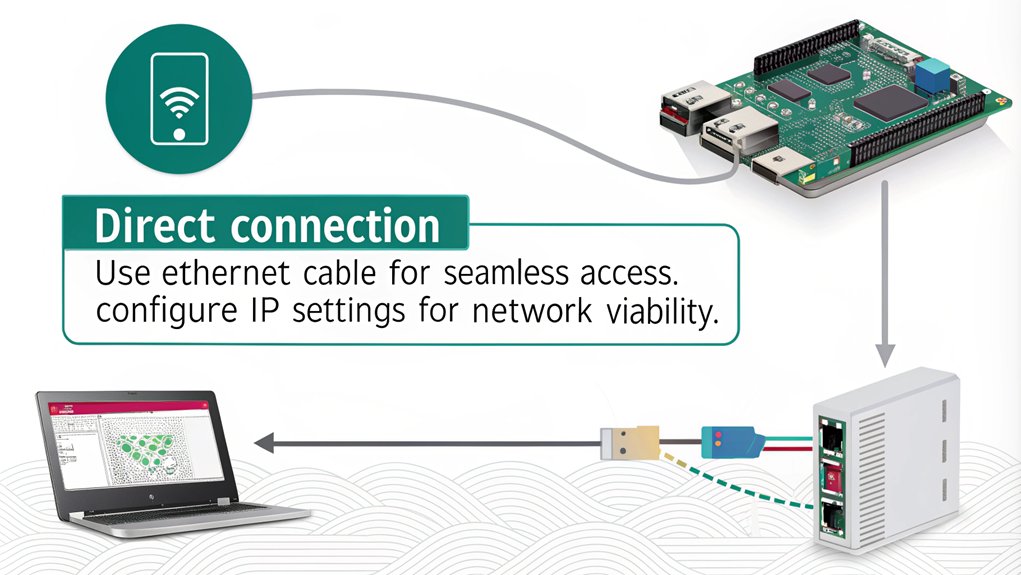
Direct Connection Method
A straightforward way to find your Raspberry Pi’s IP address is by establishing a direct Ethernet connection between the Raspberry Pi and your computer. First, connect the two devices using an Ethernet cable and power up the Raspberry Pi. Make sure neither device is connected to any other network to avoid confusion.
If you’re using a Mac, go to System Preferences, click on Sharing, and enable Internet Sharing from your Wi-Fi interface to the wired connection. This step is essential for proper Ethernet configuration. Direct Connection with a Mac ensures that your Raspberry Pi can be properly assigned an IP address. Regular checks of the Raspberry Pi IP address are recommended as they may change periodically due to DHCP settings.
Once sharing is enabled, open Terminal and type ‘ifconfig’ to identify the bridge interface, like bridge100. The Raspberry Pi’s IP address will typically be one higher than the bridge’s IP (e.g., 192.168.2.2).
For network troubleshooting, you can also access the terminal on the Raspberry Pi. Use ‘ifconfig eth0’ to find the IP directly or ‘hostname -I’ to see all associated IP addresses. This method guarantees you have a clear path to connect via SSH, allowing you to explore your Raspberry Pi projects without hassle.
Direct Connection Without Router
For those looking to connect a Raspberry Pi directly to a computer without a router, it’s a straightforward process that can be accomplished with just an Ethernet cable. You can use either a crossover or a standard Ethernet cable since most modern devices, including the Raspberry Pi, support Auto-MDIX, making crossover cables largely unnecessary.
First, set static IP addresses on both your computer and the Raspberry Pi to guarantee they’re on the same subnet. For instance, assign your PC the IP address 192.168.77.1 and the Raspberry Pi 192.168.77.2. This setup is akin to establishing an ad hoc network where both devices communicate directly without intermediary devices.
Don’t forget to configure the subnet mask, gateway, and DNS server, typically set to 255.255.255.0, 192.168.77.1, and 192.168.77.1, respectively.
If you prefer using DHCP, install a DHCP server on your computer, like ‘tftpd32’ for Windows, to allocate IP addresses to the Raspberry Pi.
Make certain both devices are connected with the Ethernet cable and that your network settings are applied appropriately. This setup not only simplifies network troubleshooting but also guarantees effective communication between your devices.
Frequently Asked Questions
Can I Connect Multiple Raspberry Pis to One Network?
Yes, you can connect multiple Raspberry Pis to one network. Just guarantee your network protocols support the device management for each Pi, preventing conflicts. Proper configuration makes it easy to manage and utilize them efficiently.
What to Do if My Raspberry Pi Won’t Connect to Wifi?
Did you know that 70% of connectivity issues stem from simple troubleshooting? Start your wifi troubleshooting by restarting your router and checking network diagnostics. Ensuring correct settings can help your Raspberry Pi connect effortlessly.
Is a Static IP Address Necessary for My Raspberry Pi?
A static IP isn’t always necessary for your Raspberry Pi. If you value simplicity and consistent access, a static IP offers benefits like reliability and easier management compared to dynamic IPs, especially for hosting services.
How Can I Change My Raspberry Pi’s Network Settings?
Think of your Raspberry Pi as a ship setting sail. To change its network configuration, edit the ‘dhcpcd.conf’ file and troubleshoot connections with commands like ‘ifconfig’. Smooth sailing awaits with the right settings!
Can I Use a VPN With My Raspberry Pi?
Yes, you can use a VPN with your Raspberry Pi. The VPN benefits include enhanced security and privacy. For a successful VPN setup, choose a compatible provider and follow their detailed installation instructions.
Conclusion
Connecting your Raspberry Pi to a network is like opening a door to a world of possibilities. Whether you choose a wired connection or plunge into the wireless domain, each method serves as a key, releasing new projects and adventures. With your Pi online, you can explore, create, and innovate, turning your ideas into reality. So go ahead, plug in or connect wirelessly—your journey into the digital universe awaits!

I am a retired software engineer with experience in a multitude of areas including managing AWS and VMWare development environments. I bought a relative a mini-PC a year ago and have become passionate about the technology and its potential to change how we deploy software.