
Build Your Own NAS Server: Top Open Source Solutions for a DIY Home Server
Building your own Network Attached Storage (NAS) server at home can be a rewarding project that offers both learning and practical benefits. By creating a DIY NAS, you can customize your storage solution to fit your specific needs, whether it’s for media streaming, creating a home lab, backing up important data, or sharing files across your home network. This article will guide you through the best open-source NAS software options and key considerations to help you build an efficient and reliable home server.
Key Takeaways
- Building a DIY NAS allows for customization and cost savings over pre-built solutions.
- Choose NAS software that fits your needs; open-source options like TrueNAS and OpenMediaVault offer robust features.
- Carefully select hardware components, ensuring compatibility and adequate performance for your storage needs.
- Incorporate sufficient RAM, especially when using memory-intensive file systems like ZFS.
- Implement backup strategies and consider adding media server capabilities to maximize your NAS’s functionality.
What Is a NAS and Why Build a DIY NAS?
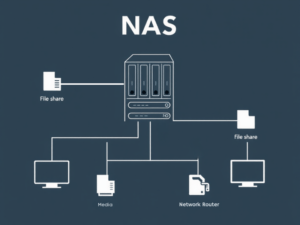
(click to expand)
A NAS is a dedicated storage device connected to a network that allows multiple users and devices to access and share data. Building a DIY Home Server gives you control over your storage capacity, hardware components, and NAS software, tailoring the system to your specific requirements. A DIY NAS can serve as a centralized storage server for your home, providing a convenient way to share files, stream media, and backup data.
By choosing to build a NAS, you’re not just assembling a storage device; you’re creating a versatile home server that can handle various tasks. Whether you’re interested in building a media server for streaming movies and music or need a reliable backup solution for your important files, a DIY NAS offers flexibility and scalability. Plus, using open-source software can reduce costs and allow for greater customization.
Choosing the Best NAS Software for Your DIY Home Server
Selecting the right NAS software is crucial for the performance and functionality of your home server. Open-source NAS solutions like FreeNAS (now known as TrueNAS Core), TrueNAS Scale, OpenMediaVault, Rockstor, and Unraid offer robust features and community support. These NAS operating systems provide a user-friendly interface for managing storage, setting up RAID configurations, and adding services like Plex Media Server.
TrueNAS Core, formerly FreeNAS, is a popular choice for DIY NAS builders. Based on FreeBSD and utilizing the ZFS file system, it offers advanced features like data integrity checks, snapshots, and replication.
If you’re interested in building a NAS with scalability in mind, TrueNAS Scale introduces support for Linux containers and virtual machines.
OpenMediaVault is another excellent NAS OS based on Debian Linux. It provides a straightforward interface and supports various plugins to extend its functionality. Using open-source software like OpenMediaVault or TrueNAS allows you to customize your NAS without the licensing costs associated with commercial solutions.
Building a DIY Home Server: Motherboard and CPU Considerations
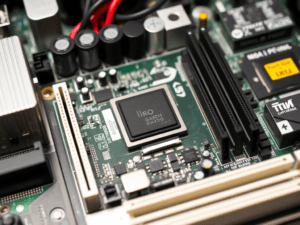
(click to expand)
Choosing the right motherboard and Central Processing Unit (CPU) is essential for your DIY Home Server build. The motherboard should have enough SATA ports to accommodate your desired number of hard drives, and at least one Gigabit NIC (Network Interface Card) for reliable network connectivity. Compatibility between the motherboard and CPU is crucial to ensure smooth operation.
For the CPU, energy-efficient options like the Intel Celeron or low-power Intel processors are ideal for NAS systems, as they offer sufficient performance without excessive power consumption. The motherboard’s form factor should match your case and provide room for future expansion if needed.
ECC RAM (Error-Correcting Code Random Access Memory) is recommended for NAS systems, especially when using file systems like ZFS, which benefit from data integrity features. ECC RAM helps prevent data corruption by detecting and correcting memory errors. Ensuring your motherboard and CPU support ECC RAM can enhance the reliability of your storage server.
There are also some mini pcs that work out of the box for this. They have fast CPUs, at least 1 TB internal storage and easily expandable with high speed ports, and fast networking.
How Much RAM Do You Need for a NAS?
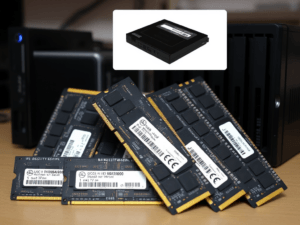
(click to expand)
The amount of RAM in your DIY Home Server affects its performance, especially when using memory-intensive file systems like ZFS. A general rule of thumb is to have at least 1 GB of RAM for every 1 TB of storage when using ZFS. For basic NAS setups, 8 GB of RAM may suffice, but for more demanding applications or larger storage capacities, consider upgrading to 16 GB or even 32 GB of RAM.
ECC RAM is particularly beneficial in a NAS environment, as it reduces the risk of data corruption. When using ZFS, ECC RAM works alongside the file system’s data integrity features to ensure your data remains accurate and uncorrupted over time.
Understanding Disk Options: HDDs, SSDs, and RAID Configurations
Selecting the right disk options is a key component of your DIY Home Server build. Traditional hard drives (HDDs) offer large storage capacities at a lower cost, making them suitable for bulk storage needs. Solid State Drives (SSDs) and NVMe drives provide faster read/write speeds but are more expensive per gigabyte. Some NAS builders use a combination of HDDs for storage and SSDs for caching to optimize performance.
RAID (Redundant Array of Independent Disks) configurations enhance data reliability and performance by distributing data across multiple disks. Common RAID levels like RAID 1 (mirroring) and RAID 5 (striping with parity) protect against disk failures. When setting up RAID, ensure your motherboard has enough SATA ports and your case has sufficient drive bays to accommodate the number of disks required.
Exploring Open Source NAS Solutions: TrueNAS, OpenMediaVault, Rockstor, and Unraid
Several open-source NAS solutions cater to different needs and preferences. TrueNAS Core (formerly FreeNAS) is a feature-rich option that uses the ZFS file system, providing advanced data protection and storage capabilities. TrueNAS Scale, built on Linux, extends these features with support for containers and virtual machines.
OpenMediaVault, based on Debian Linux, offers a simple and modular approach to NAS management. Its plugin system allows you to add functionalities like media streaming and home automation.
Rockstor is another NAS solution built on open-source software, focusing on ease of use and Btrfs file system features.
Unraid stands out by allowing you to mix and match disk sizes and types, making it flexible for upgrading storage over time. While not entirely free, Unraid offers a best value proposition for those looking for a hybrid solution between traditional RAID and pooling methods.
Ensuring Compatibility and Power Supply Requirements
Compatibility between your chosen hardware components is vital for a smooth DIY Home Server build. Ensure that your motherboard, CPU, RAM, and other components are compatible in terms of socket types and supported standards. The power supply unit (PSU) should provide enough wattage to support all components, including future upgrades, while maintaining energy efficiency to reduce power consumption.
Consider the form factor of your case and motherboard to ensure everything fits properly. A PSU that is too large or too small for your case can cause installation issues. Additionally, avoid bottlenecks by matching component capabilities; for instance, pairing a high-speed CPU with insufficient RAM can hinder performance.
USB ports can be useful for installing the NAS OS or connecting external storage devices. Ensure your motherboard has enough USB ports to meet your needs.
Setting Up Your NAS OS: Installation and Configuration Tips
Installing your chosen NAS OS typically involves creating a bootable USB drive and running the installation on your DIY Home Server hardware. For example, to install TrueNAS:
- download the ISO file from the official website
- create a bootable USB drive
- follow the installation prompts.
- During setup, you’ll configure network settings, storage pools, and user accounts.
Proper configuration is key to maximizing the capabilities of your NAS. Set up appropriate permissions, enable services like SMB or NFS to share files, and consider installing plugins or additional software for media streaming or home automation. Regularly update your NAS OS to benefit from security patches and new features.
Maximizing Your DIY Home Server: Backup Strategies and Media Server Capabilities
A NAS not only provides centralized storage but can also enhance your home network’s functionality. Implementing a robust backup strategy protects your data against loss due to hardware failure or accidental deletion. Utilize built-in features of your NAS OS or third-party tools to schedule regular backups of critical data.
Transform your NAS into a media server by installing applications like Plex Media Server. Plex allows you to organize and stream your media library to devices throughout your home and even remotely. Additionally, integrating home automation platforms like Home Assistant can further expand your NAS’s capabilities, turning it into a central hub for controlling smart devices.
Frequently Asked Questions
What is the best NAS software for a home server?
The best NAS software depends on your needs. TrueNAS, OpenMediaVault, Rockstor, and Unraid are top choices for DIY NAS setups, each offering robust features for file sharing, media streaming, and data backup.
Can I use a mini PC to build a NAS?
Yes, mini PCs are great for building a NAS. With the right motherboard, CPU, and sufficient RAM, a mini PC can handle various NAS tasks like media streaming and data storage.
Is TrueNAS better than OpenMediaVault for a DIY NAS?
TrueNAS is better for those needing ZFS and advanced data protection, while OpenMediaVault is easier to use and ideal for simpler home NAS setups.
How much RAM do I need for a NAS server?
For most NAS setups, 8GB of RAM is enough. If you’re using ZFS or handling large amounts of data, consider upgrading to 16GB or more.
What’s the difference between using HDDs and SSDs in a NAS?
HDDs are cheaper and provide more storage, but SSDs offer faster data access. Many NAS builders use a mix of both for optimal performance and storage.
Can Unraid be used for media streaming on a NAS?
Yes, Unraid supports media streaming. It’s flexible and allows you to easily expand your storage while running applications like Plex for streaming.

I am a retired software engineer with experience in a multitude of areas including managing AWS and VMWare development environments. I bought a relative a mini-PC a year ago and have become passionate about the technology and its potential to change how we deploy software.