
Why a Smart Garage Door Opener With a Raspberry Pi?
If you’re interested in building a secure smart garage door opener with Raspberry Pi gives you control and flexibility absent from many off-the-shelf solutions. By wiring a relay to the GPIO and integrating magnetic reed switches for status monitoring, you establish reliable command and audit trails. Layering a Flask web app introduces network control, but, if you want a robust system, you’ll need to address encryption, authentication, and real-time alerts as you proceed.
This article contains affiliate links. As an Amazon Associate, I might make a small commission on every purchase. No extra cost to you and it helps to support this blog.
Key Takeaways
- Use a Raspberry Pi (Model B, 3, or Pico W) with a relay module to emulate the garage wall button for door control.
- Connect magnetic reed switches to Pi GPIO pins to detect and report garage door open or closed status.
- Flash Raspberry Pi OS, enable SSH, and configure Wi-Fi for secure, headless device management from any location.
- Deploy a Flask web server with password protection, providing a mobile-first interface for remote door operation and monitoring.
- Prioritize security with strong encryption, access controls, and real-time door status alerts to safeguard your garage system.
Essential Components and Hardware Overview
A reliable smart garage door opener begins with selecting appropriate hardware that balances performance, security, and scalability. Your component selection should focus on hardware compatibility—Raspberry Pi models B or 3 offer robust GPIO for relays and sensors, while the Pico W’s built-in Wi-Fi streamlines network connectivity.

- Includes Raspberry Pi 3 B+ (B plus) with 1.4 GHz 64-bit Quad-Core Processor and 1 GB RAM
- CanaKit 2.5A USB Power Supply with Micro USB Cable and Noise Filter - Specially designed for the Raspberry Pi 3 B+ (UL Listed)
- Dual band 2.4GHz and 5GHz IEEE 802.11.b/g/n/ac wireless LAN, Enhanced Ethernet Capability


- 64-bit quad-core CPU (4GB RAM).For 2GB Version,please refer to ASIN: B0B7DFF7TY;8GB Version,please refer to ASIN:B09LYP7QH3
- This case contains a super quite 40mm PWM fan and 4pcs heatsinks for good heat dissipation of Pi 4B board.
- 5V 3.6A Type C Power Supply will make your Pi work more stable. With ON/OFF switch, it's convenient for you to power on and power off.

- Powerful Performance: Equipped with a quad-core 64-bit ARM Cortex-A53 processor, the Raspberry Pi Zero 2 W delivers a significant performance boost compared to its predecessor.
- Wireless Connectivity: Built-in Wi-Fi and Bluetooth support enable easy wireless communication and Internet access for your projects.
- Compact Form Factor: The tiny size of the Raspberry Pi Zero 2 W makes it perfect for space-constrained projects and embedded applications.
When building a smart opener, it’s essential to remember that Raspbian operating system provides a stable foundation and is easily obtainable from the Raspberry Pi official website, allowing quick setup and smooth integration with web server and relay controls. Be sure to utilize reed switches for open/close state detection, as these low-cost components have been proven for reliable feedback in several foundational garage door automation projects.
Prioritize a 5V relay module with built-in LEDs to facilitate safe, isolated control of the motor—this guarantees low-voltage logic doesn’t directly interface with high-current devices. Add magnetic reed switches for accurate door status feedback, wiring them to GPIO for protocol-aware input monitoring.
Integrate a dependable power supply and secure wiring using heat-shrink tubing and zip ties. Use a trusted SD card for Raspberry Pi OS installation. Confirming every component interoperates minimizes attack surfaces and fosters scalable innovation.
Circuit Design and Wiring Diagram
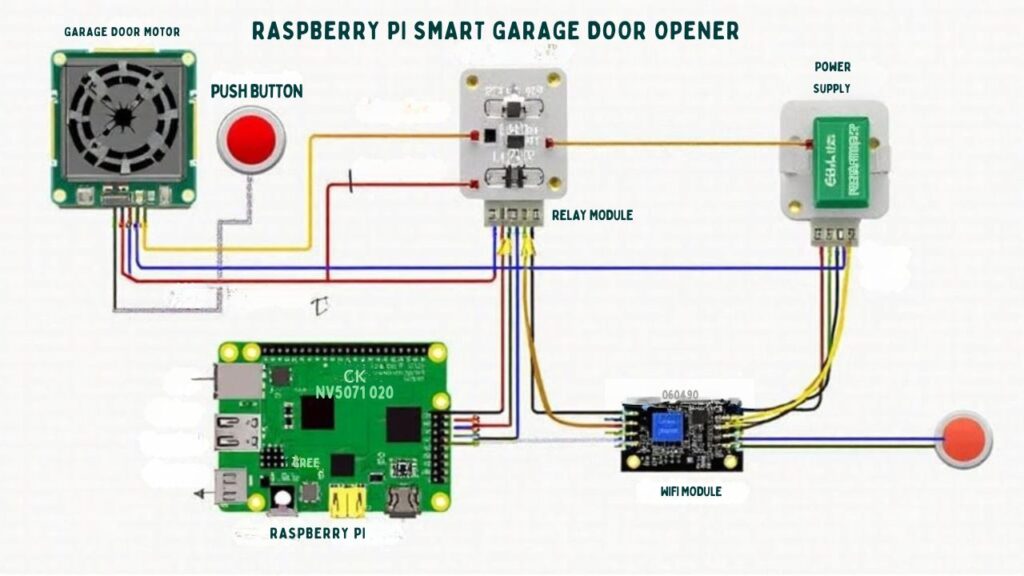
Once you’ve gathered compatible hardware, focus shifts to the precise layout of your circuit.
Begin by wiring the relay module: connect its control side to a Pi GPIO pin through a resistor-driven transistor, ensuring the relay coil is never powered directly from the Pi. Tie Pi ground, relay ground, and switch ground together for signal integrity. Importantly, not all garage door opener models may allow for relay integration, so double-check your opener’s compatibility with this approach before proceeding.
Wire the relay’s control input to a Pi GPIO via a transistor, and join all grounds for clean, reliable signal flow.
On the relay’s switch side, use only the common and normally open terminals to mimic the wall button; this maintains electrical isolation as a relay safety measure. Integrate a flyback diode across relay coil terminals to absorb voltage spikes.
Connect magnetic reed switches to GPIO inputs, leveraging internal pull-ups and employing software debounce for noise immunity. For stable and reliable power delivery, ensure that only the garage door and Raspberry Pi are powered, since the Pi will independently energize the relay in operation.
Circuit troubleshooting techniques such as continuity checks and logic verification are crucial for safe, reliable operation.
Setting Up the Raspberry Pi and Operating System
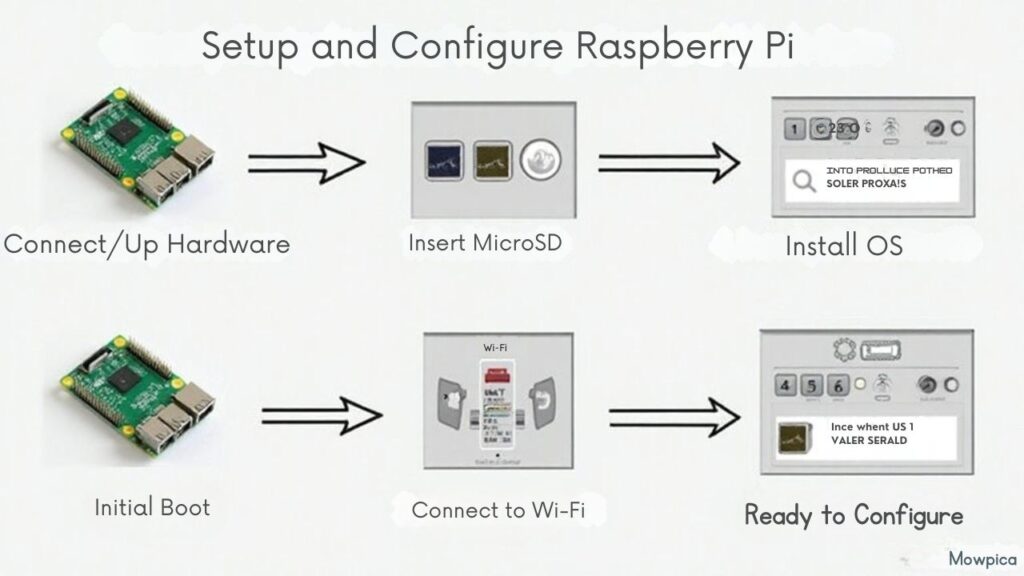
Before you can automate your garage door, prepare the Raspberry Pi by loading a secure, up-to-date operating system and configuring essential network services.
Start by flashing Raspberry Pi OS onto at least a 2GB SD card using Balena Etcher or Raspberry Pi Imager. For initial configuration, enable SSH and provision Wi-Fi credentials for headless access—place ‘ssh’ and ‘wpa_supplicant.conf’ onto the boot partition. As an important preparation step, gather all necessary hardware components—such as the Raspberry Pi board, power supply, relay module, and garage door sensor—before beginning the software setup. Using Python code on the Raspberry Pi makes it flexible and easily adaptable for different garage door models or additional features.
Power up the Pi, connect remotely via SSH, and immediately update all packages. Set a static IP or implement Dynamic DNS to guarantee consistent network access. Harden remote communications with self-signed SSL certificates and basic authentication.
For troubleshooting tips, confirm Wi-Fi signal strength and verify SSH access before proceeding. With Apache and WiringPi installed, validate both web server and GPIO control functionality.
Relay Integration for Garage Door Control
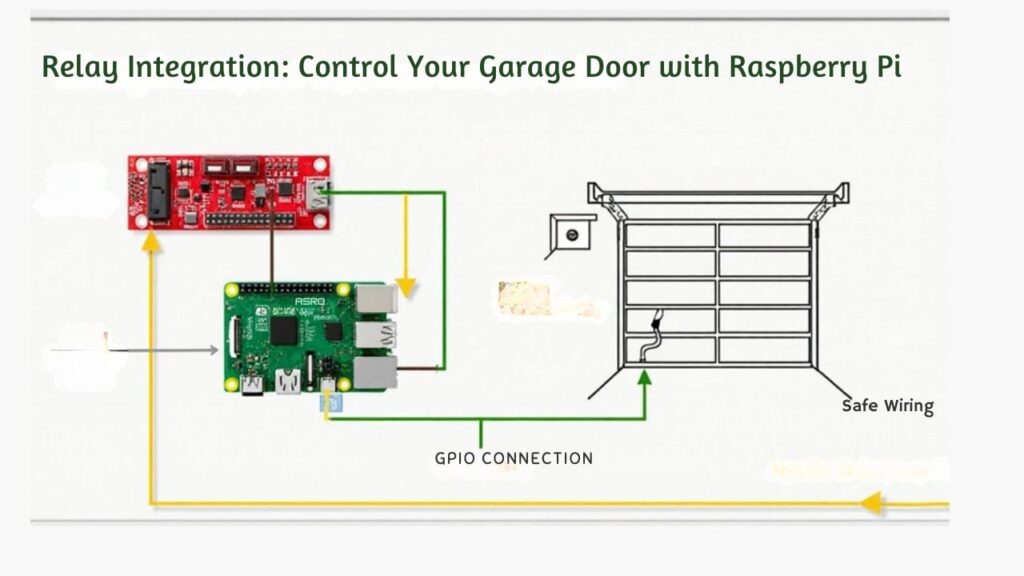
When automating your garage door, integrating a relay module with your Raspberry Pi guarantees safe electrical isolation and reliable actuation. For certain projects, it’s often both cost-effective and practical to use wired switches for sensing the fully open and fully closed positions. Select relay types that match the Pi’s 3.3V GPIO logic, or use modules with built-in driver circuitry or optocoupler isolation to safeguard against voltage spikes.
Always verify the relay’s load ratings exceed your garage door motor’s current and voltage demands—common specs are AC 250V/10A or DC 30V/10A for robust protection. Before finalizing your parts list, measuring voltage across switch contacts on your garage door opener ensures you select components appropriate for the actual operating voltage at the control circuit.
Wire the relay in parallel to the wall button circuit, so it emulates a button press without altering the garage opener’s wiring. Employ onboard status LEDs for real-time troubleshooting.
Implement startup scripts to initialize GPIO in a relay “off” state, enhancing safety features and preventing unintended activations during boot cycles.
Reed Switch Setup for Real-Time Door Status
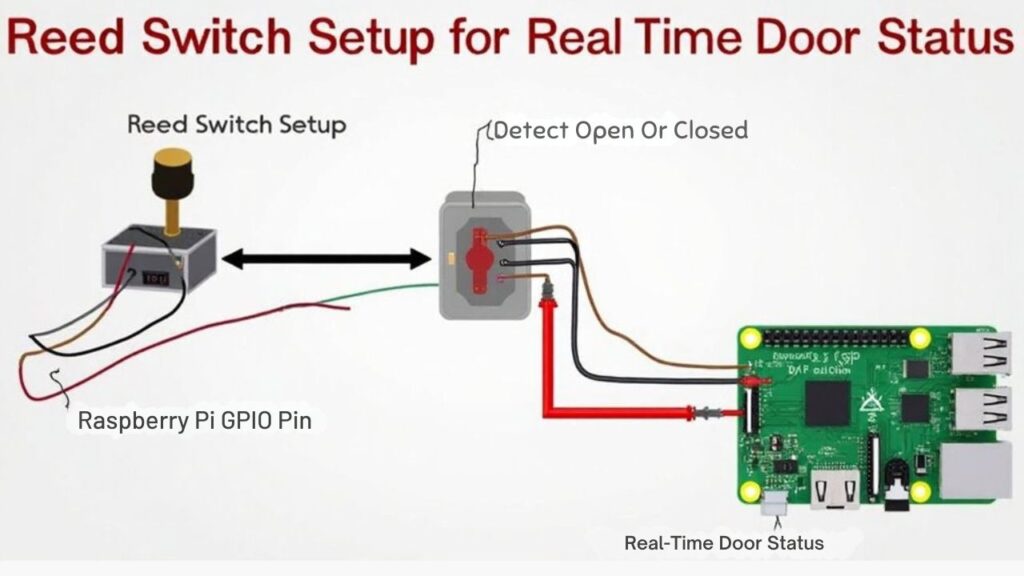
Next, you’ll need to wire the reed switch correctly to a Raspberry Pi GPIO pin using a reliable pull-up or pull-down resistor to guarantee stable signal detection.
As you monitor door state changes, your software should rapidly and securely track the input to reflect open or closed status in real time. Using a thread-per-task approach in your code helps manage simultaneous monitoring, notifications, and state transitions efficiently.
Don’t overlook signal integrity or error detection—these are key for both safety and robust alerting against faults or tampering.
It’s important to note that magnetic switches typically provide more reliable long-term performance and are easier to mount than traditional mechanical switches.
Wiring Reed Switches Properly
Although reed switches seem simple, correct wiring is vital for reliable real-time garage door status detection and safe operation. When working with reed switch types—normally open (NO) or normally closed (NC)—pick one that achieves your intended door state reporting by exploiting magnetic proximity. Incorrect wiring can result in the relay unintentionally activating the garage door when the reed switch magnets align, which highlights the importance of carefully following device-specific wiring diagrams.
Always connect one reed switch lead to ground, the other to your device’s input (like a Shelly’s SW terminal), maintaining common ground to avoid voltage discrepancies. Secure wiring is essential: prevent accidental shorts, and use signal conditioning tools—like pull-ups or pull-downs—to maintain clean inputs. Because each component plays a critical role in the garage door monitor’s functionality, double-check every connection before powering the system. Here’s a comparison for quick reference:
| Aspect | Recommendation |
|---|---|
| Reed Switch Type | NO for state change detection |
| Proximity Setup | Magnet on moving part, switch fixed |
| Electrical Path | Ground to input, shared reference |
| Signal Stability | Pull-up/pull-down, proper enclosure |
Monitoring Door State Changes
If you want reliable, real-time awareness of your garage door’s position, integrate reed switches with your Raspberry Pi and connect them using secure, properly conditioned wiring. Magnetic reed switches provide discrete open/closed feedback by physically switching states when the garage door moves past them, which makes them ideal for monitoring applications like this. By mounting a reed switch and magnet precisely, you enable the Pi to detect door state changes instantly—open, closed, or in motion—by sensing when the magnetic field is present or absent.
To guarantee accuracy, perform sensor calibration during installation; this assures the system triggers only on genuine door movement and prevents false readings. For projects that call for increased robustness and multi-device connectivity, consider integrating MQTT message broker support, allowing real-time status updates to be communicated between multiple microcontrollers or networked devices.
Program your Pi (using Python or Rust) to poll the sensors, update the web interface, and trigger alerts if the door remains open too long.
For higher security, encrypt communication and restrict access to the door state dashboard using strong authentication protocols.
Building the Web Server and User Interface

While setting up your smart garage door opener, configuring the web server and crafting a secure user interface form the project’s backbone. Precision in each layer is essential for both usability and safety. Here’s how to align your implementation with modern standards:
- Web Server & Port Configuration: Deploy Flask for dynamic GPIO control; assign ports deliberately (default 5000 or 80). Harden by removing default credentials and restricting file access. Collaborating with interested community members for troubleshooting and advice can be crucial during this stage.
- User Interface & Button Design: Develop a mobile-first UI with a single, prominent button. Integrate AJAX to eliminate state conflicts from page reloads and enable real-time status indicators.
- Security & Session Management: Enforce password-based access. Never skip session management or credential updates for end-to-end protection.
- PWA Support, Logging & Error Handling: Add manifest files for homescreen installability, incorporate robust logging integration, and automate server restarts for resilience.
Mobile and Voice Command Integration

After you’ve secured your web server and refined the user interface for local control, extending access to mobile devices and integrating voice commands maximizes both convenience and flexibility. You can leverage mobile app integration via responsive web interfaces or third-party apps like Blynk, enabling seamless remote control of your garage from any location. For voice command accuracy, API links to Alexa, Google Assistant, or platforms like Home Assistant let you trigger your Raspberry Pi’s GPIO securely through spoken commands. Automation scripts (Apple Shortcuts, Tasker) enable personalized HTTP triggers.
When installing the magnetic contact switch, proper installation is critical for reliably detecting the closed or open status of your garage door and enabling accurate remote status notifications. Implement HTTPS, VPNs, and strict authentication to guarantee only authorized users issue commands. Physical buttons can still be used alongside the app, so you maintain manual control even as you adopt automated and wireless features. Below compares control integration strategies:
| Feature | Recommended Tool/Platform |
|---|---|
| Mobile App Integration | Blynk, AJAX-enhanced browser |
| Voice Command Accuracy | Alexa, Google Assistant, HA |
| Automation | Tasker, Apple Shortcuts |
| Backend Security | HTTPS, VPN, Authentication |
Monitoring, Logging, and Security Features

You’ll want to implement real-time door status updates using AJAX and Flask to maintain accurate monitoring via your web interface. To safeguard your system, restrict access through network controls like VPN and guarantee all communication uses robust encryption protocols such as WPA2. Consider integrating reed switches or light sensors for enhanced position detection, as these are reliable methods for determining the actual state of your garage door beyond simple software-based indicators. Incorporating hourly notification alerts can ensure you are promptly informed if the garage door remains open for an extended period. Combining these features provides both immediate situational awareness and strong access control for your garage door opener.
Real-Time Door Status
A robust smart garage door opener depends on three essential features: real-time status monitoring, activity logging, and rigorous security controls.
Leveraging advanced sensor technology, you’ll guarantee continuous, real-time updates about your door’s position. Typically, magnetic reed switches or Hall effect sensors connect to a Raspberry Pi Pico W or ESP8266 for rapid data relay. For even greater reliability, consider using the Sparrow wireless sensor node as it has been identified as a potential sensor solution for transmitting door status to your smart home system.
To reliably capture the door’s movement and current state, consider these protocol-oriented practices:
- Deploy multiple sensors to accurately detect open, closed, and moving states.
- Use MQTT for secure, low-latency messaging between sensors and the Raspberry Pi.
- Present real-time status via HTTP servers on your LAN for instant accessibility.
- Integrate notification triggers—alerting you if the door’s left open, or a sensor malfunctions.
This foundation strengthens oversight and streamlines further security enhancements.
Secure Access Control
Securing your smart garage door opener goes beyond robust mechanics—it demands layered authentication, encrypted communications, and meticulous monitoring.
Start by deploying WPA2 security protocol with a truly random 64-character key for wireless connections. Don’t settle for simple password management; implement rolling credentials and robust encryption methods to protect access control and user authentication.
API security is critical—lock down control endpoints with authenticated REST interfaces, and never allow plaintext password transmission. For remote access, utilize VPN tunnels and keep web servers private on your LAN.
Enhance monitoring through rigorous logging practices: timestamp every remote command, leverage email or SMS alerts, and integrate camera modules for visual logs.
Assign granular permissions and enforce strict session controls for all user interactions and access events.
Cost Analysis and Project Expansion Ideas
Although building a smart garage door opener with a Raspberry Pi delivers flexibility and control over commercial alternatives, it’s important to weigh the cost of each component and consider opportunities for future expansion.
When doing a cost comparison, project budgeting should include both basic and advanced elements to match your functional and security needs. Most DIY builds with essential parts start near $53, cheaper than commercial units, while fully featured projects may approach $170.
To innovate cost-effectively and expand functionality, consider:
- Expanding to control multiple doors with additional relay channels and GPIO pins.
- Integrating sensors for real-time door status and automation triggers.
- Adding peripherals—such as cameras or warning indicators—for safety and monitoring.
- Enhancing software with MQTT or SSL-secured interfaces for robust, protocol-aware remote management.
Prioritize security and modularity as you scale.
Here are some options for a Raspberry Pi if you need one:
- Includes Raspberry Pi 3 B+ (B plus) with 1.4 GHz 64-bit Quad-Core Processor and 1 GB RAM
- CanaKit 2.5A USB Power Supply with Micro USB Cable and Noise Filter - Specially designed for the Raspberry Pi 3 B+ (UL Listed)
- Dual band 2.4GHz and 5GHz IEEE 802.11.b/g/n/ac wireless LAN, Enhanced Ethernet Capability
- 64-bit quad-core CPU (4GB RAM).For 2GB Version,please refer to ASIN: B0B7DFF7TY;8GB Version,please refer to ASIN:B09LYP7QH3
- This case contains a super quite 40mm PWM fan and 4pcs heatsinks for good heat dissipation of Pi 4B board.
- 5V 3.6A Type C Power Supply will make your Pi work more stable. With ON/OFF switch, it's convenient for you to power on and power off.
- Powerful Performance: Equipped with a quad-core 64-bit ARM Cortex-A53 processor, the Raspberry Pi Zero 2 W delivers a significant performance boost compared to its predecessor.
- Wireless Connectivity: Built-in Wi-Fi and Bluetooth support enable easy wireless communication and Internet access for your projects.
- Compact Form Factor: The tiny size of the Raspberry Pi Zero 2 W makes it perfect for space-constrained projects and embedded applications.
Frequently Asked Questions
How Do I Troubleshoot Wifi Connectivity Issues With My Raspberry Pi Garage Controller?
For WiFi troubleshooting, check your Raspberry Pi configuration: confirm wlan0 visibility with `ifconfig`, validate `wpa_supplicant.conf` settings, update firmware, and guarantee the power supply’s adequate. Secure your network with WPA2, and monitor logs for errors.
Can the System Send Notifications if the Door Is Left Open Too Long?
Picture your castle gate left ajar—your digital sentry watches closely. If your door sensor detects too long an opening, configurable notification settings use secure protocols to instantly alert you, keeping your stronghold safe and innovative.
Is It Possible to Integrate the Opener With Smart Home Platforms Like Home Assistant?
You can achieve robust smart home integration and Home Assistant compatibility using GPIO or MQTT protocols. You’ll benefit from secure, local control, granular automation, and seamless status reporting—all while supporting advanced, security-focused innovations without cloud dependencies.
What Should I Do if My Garage Opener Uses a Proprietary Remote Frequency?
When there’s a will, there’s a way—don’t just jump into frequency hacking. Explore alternative solutions like triggering relays on the wired switch or using SDR tools, keeping security risks and the proprietary protocol’s complexity top of mind.
How Can I Make the Interface Accessible When Away From My Home Network?
To access your interface remotely, set up dynamic DNS for a persistent address, configure secure access with VPN or HTTPS, enable two-factor authentication, and keep everything updated. Prioritize firewall, encryption, and strong authentication to prevent unauthorized entry.
You Now Have a Smart Garage Door Opener With A Raspberry Pi!
Congratulations, you’re now the overlord of your own garage—because who needs commercial IoT when you can juggle GPIO pins and Flask routes at 2 a.m.? With a fortress secured by reed switches and SSL, you’ve outsmarted door-to-door hackers everywhere. Just remember, your Pi’s only as safe as your update schedule. Now if only you could automate cleaning the garage, too. Until then, reboot responsibly and never trust an unencrypted packet.

I am a retired software engineer with experience in a multitude of areas including managing AWS and VMWare development environments. I bought a relative a mini-PC a year ago and have become passionate about the technology and its potential to change how we deploy software.