What is the Raspberry Pi Imager?
Want a quick way to prepare your micro sd card with Raspberry Pi OS (or Raspbian as it was called) and other operating systems? The raspberry pi imager makes it easier than ever to use raspberry pi devices at home or work. In this post, learn how to use raspberry pi imager with simple steps. This guide is worth reading because it outlines the full setup process, offers practical tips for raspberry pi users, and references related posts that provide even more support.
Key Takeaways
- Raspberry Pi Imager streamlines OS installation and eliminates manual steps.
- Advanced options allow SSH, Wi-Fi, and headless setup configuration before booting.
- Compatible with multiple platforms, supports various OS choices, and offers a simple user interface.
What Is the Raspberry Pi Imager and Why Consider Open Source OS?
The raspberry pi imager stands as an official raspberry pi utility to flash various os images to an sd card without extra hassle. It allows you to skip the separate step of manual image download and complex setup. You can rely on this tool to bring multiple cards to life, each with a different operating system image that you can deploy on your device. The raspberry pi foundation made a simpler way to help people quickly prepare systems, offering an open source approach that supports hobbyists, professionals, and advanced users.
When you use this utility, you can choose from a list of operating systems, including ubuntu, ubuntu mate, and popular distributions like raspbian os. This flexibility proves valuable if you often switch between different tasks or projects. The tool’s made a simpler way approach, coupled with its open-source nature, ensures transparency. Originally written as a modification of the pibakery tool, the raspberry pi imager aims to streamline setup by reducing complexity. Thus, you can quickly select from an os list, skip manual steps, and flash it straight to the sd card. You avoid tools like etcher or other manual flashing processes that once dominated the scene.
Below is a sample comparison table. Each row highlights a popular OS choice, a brief feature summary, and notes on how suitable it is for Raspberry Pi:
| Operating System | Feature Summary | Raspberry Pi Suitability |
|---|---|---|
| Raspberry Pi OS | Officially backed, well-optimized, stable | Excellent choice for all Pi models, beginner-friendly |
| Ubuntu | Popular Linux distro, large app repository | Best on Pi 4+ for desktop-like experience, suitable for advanced users |
| Ubuntu Mate | Lightweight desktop, user-friendly interface | Good for Pi 4+; offers a familiar Linux feel with moderate resources |
| Raspbian (Legacy) | Classic OS with minimal resource usage | Perfect for older Pi models, stable and reliable |
| Kali Linux | Security-focused, preloaded with testing tools | Suitable for professionals and power users on Pi 4+ |
| RetroPie | Gaming-centric, integrated emulator support | Great for retro gaming on Pi 4+ and hobby projects |
| LibreELEC | Media-center OS optimized for Kodi playback | Ideal for a Pi 4-based home media center setup |
How Does the Raspberry Pi Imager Help with Installing OS on an SD Card
The raspberry pi imager downloads images from the official website, reading it back from github or other trusted sources. You no longer need to scroll through a website with a list of all current download options. Instead, the utility reads the relevant file directly and writes it straight to the sd card. This process quite considerably compared to the standard process offers a more streamlined workflow. It saves time and avoids confusion.
Here’s how it works: After choosing from a list of all current download sources, you pick your desired operating systems (like ubuntu, raspbian, or even special builds for the raspberry pi 4). The raspberry pi imager also grants you the freedom to handle the chosen image file seamlessly. When you insert a micro sd card or larger storage device like an nvme, the software guides you through the process. With a single click, it fetches and writes the downloaded operating system image onto the sd card. This eliminates several manual steps. That’s why advanced users consider it a game-changer.
Is the New Raspberry Pi Imager Recommended from Medium Guides and Stories to Help Setup?
If you search online, you’ll find recommended from medium posts and stories to help you unlock the full potential of the new raspberry pi imager. Many tech enthusiasts share personal experiences, walking through each step from download to configuration. These stories highlight how the raspberry pi imager supports users on different platforms like macos, linux, and even available for windows.
By following these community-driven articles, you can learn how to set intricate details like username and password, custom hostnames, or advanced OS configurations. The presence of user-generated content also ensures that if you encounter issues, you might find troubleshooting steps or hints that help you proceed. Though you might not always receive direct responses yet, these documented stories act like your friendly guide. They show how to use and super speedy methods for finishing the setup thanks to some shortcuts that the raspberry pi imager provides.
Are There Responses Yet on Using the Raspberry Pi Imager for Multiple OS?
Sometimes, you look for community input. Are there responses yet that explain how to flash multiple cards without having to download separate images each time? Yes, community forums and Q&A sites host people discussing how to handle multiple OS using raspberry pi imager. For instance, if you repeatedly download the file for ubuntu or another OS, you might appreciate that the imager stores these available options neatly in a menu. You can select your sd card and the OS you need from one interface.
If you find no responses yet to a particular raspberry problem on a forum, don’t worry. The official raspberry pi documentation and user base are enormous. By exploring other posts, or checking related tags, you’ll eventually find insights or discover that you can accomplish what you need with a simple tweak. The robust community around the raspberry pi imager fosters knowledge exchange. While you might not get immediate responses yet, patience and exploring official channels or stories to help can resolve many queries.
What SD Card Requirements Are Needed to Use Raspberry Pi Imager?
Choosing a reliable sd card is crucial. The recommended capacity often starts at 8gb, though larger is better if you plan to install bigger operating systems. A 32gb option commonly provides ample space for a variety of images. Check that the card uses a compatible format like exfat or FAT32, and ensure your sd card reader works well with your host machine.
| SD Card Class | Description | Suitability for Raspberry Pi |
|---|---|---|
| Class 4 | Basic speed for standard tasks | Suitable for older Pi models; may slow down newer Pi boards |
| Class 10 | Faster read/write speeds for smoother use | Good overall choice for all Pi models, including Pi 4 and Pi 5 |
| UHS-I | Ultra High Speed for enhanced performance | Ideal for newer Pi models, ensures quicker boots and faster app loading |
| UHS-II | Very high speeds, often overkill for most tasks | Generally not necessary; minimal gains on Raspberry Pi compared to UHS-I |
| A1/A2 Rated | Optimized for app performance (random I/O) | Excellent for both older and newer Pi models needing faster application use |
Try a reputable brand like sandisk. When you use the raspberry pi imager to flash the OS, you ensure the OS image goes straight to the sd card. No need for external tools. Just remember to use quality hardware to reduce the chance of data corruption. This utility simplifies the process, allowing you to write the operating system image easily, then verify by reading it back to confirm integrity.
How to Use Raspberry Pi Imager to Install a Raspberry Pi OS?
(click to expand)
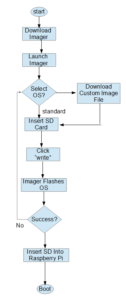
If you want to load the raspberry pi os, the steps are straightforward. First, visit the official raspberry pi download page. This page shows a website with a list of supported OS images. Click the raspberry pi imager downloads link and download the imager for your platform (Windows, mac os, or linux). After installing it, open the tool.
Within the imager, choose “Raspberry Pi OS” from the OS list. Insert your micro sd card into your machine. Then, select your sd card from the menu. Finally, confirm your choice, and the tool will download the file and flash it automatically. The utility reads the relevant file, reducing your input. In a few minutes, you have a ready-to-boot raspberry pi os card. Insert it into your raspberry pi 4 or raspberry pi 5, and power on. You bypass the manual steps to set up your raspberry pi. This streamlined process suits beginners and advanced users alike.
How to Set Up Your Raspberry Pi with Advanced Options for Headless Setup?
If you want to set up your raspberry pi without a desktop environment or without connecting a monitor, the raspberry pi imager enables this smoothly. Inside the advanced options, you can configure certain parameters before writing the image. This includes setting username, hostname, and even enabling ssh. By using these advanced options, you can prepare a headless configuration and skip plugging in a keyboard or display.
Before you flash, click the gear icon (if present) or the advanced options button. Here, enter the ssid and password for your wi-fi network. Enable ssh and specify a username and password for security. Once done, the imager will embed these details into the image before flashing, letting you boot directly into a ready-to-go environment. This approach removes extra manual steps and offers a headless setup that’s convenient and time-saving.
What Tutorial Steps Are Needed to Install Custom OS with the Raspberry Pi Imager?
For those who need a more specialized environment, consider using the use custom option. This allows you to load an image file you’ve sourced yourself. Suppose you have a rare Linux distribution or a tailored build from github. If you want to follow a tutorial on a specialized website, you can do so by selecting install custom OS from the imager’s menu. This is perfect if you work with a particular raspberry configuration that’s not in the official list.
First, download the custom OS image. Then open the raspberry pi imager, choose “Use Custom,” and navigate to the stored image file. Select your sd-card, confirm, and proceed. The tool will handle the rest, writing the OS to the card. This approach frees you from command line tools or third-party apps. Plus, thanks to some shortcuts in the imager’s interface, you’ll find the entire experience smoother.
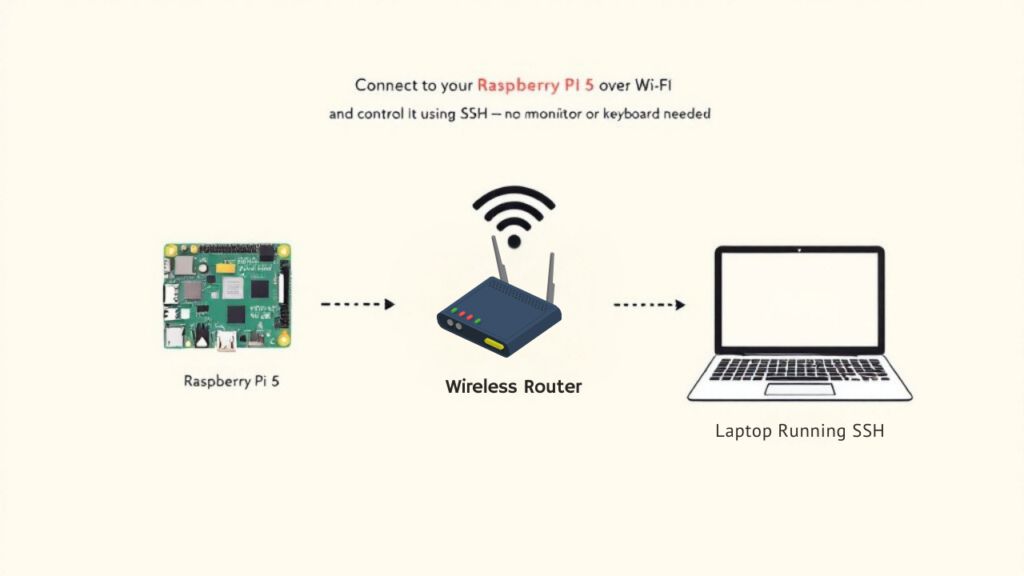
How to Perform a Headless Setup and Enable SSH on a Raspberry Pi 5?
The raspberry pi 5 supports the same streamlined approach. To achieve a headless setup, open the raspberry pi imager, select your OS (e.g., ubuntu, raspbian, or even ubuntu mate), and click the advanced options. Set “Enable SSH,” choose your username and password, and optionally configure the wi-fi settings. When you write the image, all these preferences embed into the OS. That means when you power on the board, you can immediately find the ip address and connect over SSH from a terminal window.
This approach allows you to skip any direct monitor or keyboard interaction. The process also benefits from the imager’s design. You handle these settings at flash time, reducing complexity later on. No need to fuss with additional configuration files or putty sessions before you can start. Just connect, log in, and get to work. For developers who frequently need to re-flash their boards, this headless option saves time and avoids frustration.
Where to Find Related Posts and Tips for Operating Systems, Ubuntu, and More?
If you need more guidance, look at related posts on the official website or community forums. Blogs, Q&A boards, and the raspberry pi documentation often link to further resources. They might detail special configurations, show how to adjust the eeprom, or provide pointers for using macos or linux hosts.
Check out various how-to guides that discuss the tools like the raspberry pi imager. Some even illustrate how to boot from a larger storage device, like nvme, or use multiple cards to test different OS versions. You might discover instructions for enabling advanced features, managing secure credentials, or handling OS updates. These sources often highlight new features in the imager or address niche use cases. If you face hurdles, reading community posts and official guides ensures you can conquer them with ease.
Additional Notes and Tips
- The raspberry pi imager reduces manual intervention.
- Installing OS with one click: The tool fetches images, writes them, and verifies their integrity.
- Multiple OS: Explore operating systems like ubuntu, raspbian and other operating systems, or custom builds.
- Enable ssh before booting: Set credentials and network early.
- Check mac os, linux, or Windows compatibility.
- Use raspberry pi imager one time to streamline initial setup.
- New raspberry pi imager versions frequently add user-friendly features.
- By using advanced options, you handle hostname, password, and wifi.
- Accessing a headless setup becomes easy with minimal steps.
- Writing an OS image to the sd card without searching multiple places.
- Consider specialized images like ubuntu mate or advanced OS builds from github.
- Remember to check the official raspberry pi website for updates.

I am a retired software engineer with experience in a multitude of areas including managing AWS and VMWare development environments. I bought a relative a mini-PC a year ago and have become passionate about the technology and its potential to change how we deploy software.