To access the Raspberry Pi Imager advanced options, press CTRL + SHIFT + X on Windows or Linux, or click the gear icon. This feature lets you customize settings like hostname, username, password, SSH access, and timezone right from the start. By entering your Wi-Fi credentials, you can even set up a headless installation, allowing for remote access without needing peripherals. This streamlines your setup and improves device management. You’ll find it especially helpful for configuring multiple devices. Want to know which settings can enhance your project even further? There’s plenty more to discover!
Key Takeaways
- Access advanced options by pressing CTRL + SHIFT + X or clicking the gear icon in Raspberry Pi Imager version 1.6 or later.
- Configure essential settings like hostname, username, password, and SSH for a seamless headless installation process.
- Enter Wi-Fi credentials directly to eliminate the need for creating a wpa_supplicant.conf file for easier network connectivity.
- Save customized configurations for future setups to ensure consistency and save time across multiple devices.
- Adjust display settings and keyboard layouts to optimize user experience and prevent input errors.
What is the Raspberry Pi Imager?
The Raspberry Pi Imager is an official tool that allows you to write an OS onto an SD card or microSD card. This easy-to-use software, available on the Raspberry Pi website, eliminates manual processes like formatting and file transfers.
Advanced options that enable advanced users to customize the OS make it a powerful tool for efficient setup and automation.
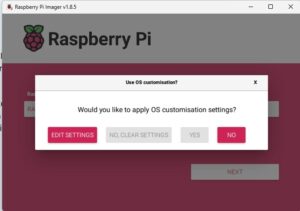
Accessing the advanced options in Raspberry Pi Imager can be a game-changer for your projects.
You’ll find these features hidden by default, designed to keep the interface clean for general users. To unearth these tools, simply press CTRL + SHIFT + X. This shortcut works seamlessly across different operating systems, including Windows and Linux, and is consistent, regardless of the version you’re using. If you’re on version 1.6 or later, consider yourself in luck.
User feedback suggests that while the hidden design helps declutter the interface, it can also make accessing advanced options feel less intuitive. However, once you activate these settings, you can streamline your workflow considerably. No need to tinker with configuration files for tasks like setting up Wi-Fi or enabling SSH—just configure everything in one go. The introduction of advanced configuration options enhances flexibility for specific project requirements, such as enabling headless setup without additional configuration files.
These advanced options not only simplify initial setup but also enhance your experience when working on headless and remote projects.
Leveraging this hidden power can elevate your Raspberry Pi experience, allowing you to innovate and explore new possibilities with ease.
Raspberry Pi Imager Advanced Options Overview
When setting up your Raspberry Pi, it’s essential to get your configuration settings right. You’ll want establish network identification settings for easy connectivity. This process can be optimized by ensuring your OS supports dual-band Wi-Fi, which is a feature of the Raspberry Pi OS. Custom image flashing prompts advanced options that can further enhance the setup process. Using the Raspberry Pi Imager allows you to pre-configure essential settings like Wi-Fi and SSH to streamline your experience. Additionally, ensuring proper cooling solutions, such as heat sinks, is crucial for preventing overheating during extended use. Let’s explore how these adjustments can enhance your Pi experience.
Network Identification Settings

Configuring network identification settings on your Raspberry Pi is essential for seamless connectivity and easy identification on your local network. One critical aspect is the hostname configuration, which allows your Raspberry Pi to broadcast a specific name using mDNS. By setting a unique hostname, you enhance network visibility, enabling other devices to communicate with your Pi effortlessly using ‘
You can customize this hostname during the OS setup process in the Raspberry Pi Imager, guaranteeing your device stands out on the network from the get-go. Ensuring you have a model with suitable connectivity options, such as USB 3.0, can further enhance your setup experience. To access the advanced settings where this option resides, press CTRL + SHIFT + X. This hidden menu also allows you to pre-configure hostname settings before writing the OS to your micro SD card.
Proper network identification simplifies remote access and management of your projects. The process doesn’t stop at hostname configuration; confirm your wireless connectivity parameters, like SSID and passwords, are set up.
These steps collectively streamline your Raspberry Pi’s integration into your network, paving the way for innovative projects while maintaining a robust, identifiable presence.
Setting Up Headless Installation
To set up a headless installation of your Raspberry Pi, you’ll first need to prepare your environment by downloading the Raspberry Pi Imager and having a microSD card ready for use. Insert the microSD card into your PC and make sure it’s accessible. You’ll also need the necessary hardware: your Raspberry Pi, power supply, and any required adapters. Headless setup allows you to configure your Raspberry Pi remotely without any additional peripherals.
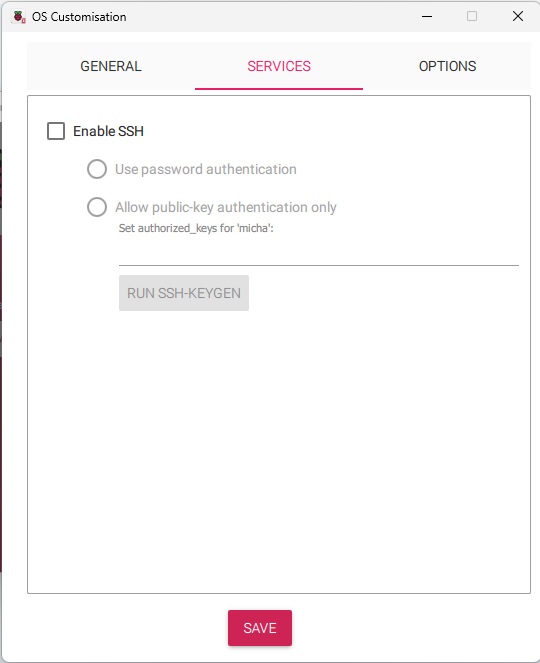
Once your setup is ready, open the Raspberry Pi Imager and press ‘Ctrl + Shift + X’ to access the advanced options menu. Here, enable SSH for remote access. Don’t forget to assign a hostname for easy identification and connection. It’s important to ensure that you select the correct OS version—32-bit armhf—to avoid network issues during setup. This process leverages the device’s low power consumption, making it suitable for continuous operation.
Configure your WiFi settings by entering your country code, WiFi SSID, and password.
Select the “Raspberry Pi OS Lite” option—perfect for headless setups. Choose the microSD card as your storage device, apply the advanced options you configured earlier, and start the writing process. Ensure you have a compatible VideoCore VII GPU if you plan on utilizing graphical capabilities in the future.
Wait until it completes, making sure the SD card isn’t removed prematurely.
Insert the microSD card into the Raspberry Pi, power it on, and let it connect to your WiFi network. Use SSH to access your headless Pi and get started on your projects
Customization Options Explained
The advanced options in Raspberry Pi Imager provide a powerful way to tailor your installation experience. By pressing CTRL + SHIFT + X, you reveal a menu with additional configuration choices designed for advanced users. This hidden gem allows you to enhance your customization benefits and optimize the user experience right from the start.
With the advanced menu, you can set your Raspberry Pi’s hostname for easy identification on your network, enable SSH for remote access, and configure WiFi settings without fussing with a config file. These adjustments can apply to a single imaging task or be saved for future use, simplifying your setup for multiple devices. Additionally, for those unfamiliar with the imaging process, the Raspberry Pi Imager provides a user-friendly interface that encourages more users to engage with their projects. Furthermore, these customization options not only enhance usability but also facilitate a headless installation process.
You can also personalize your display and locale settings—adjust overscan to eliminate screen borders and choose your preferred language and keyboard layout.
Pre-configuring these settings before writing the OS to your micro SD card means fewer manual tweaks later on, streamlining the entire process.
Compatibility and Availability
Raspberry Pi Imager boasts impressive compatibility with a range of operating systems and hardware, making it a versatile tool for enthusiasts and professionals alike. You can effortlessly install operating systems like Raspberry Pi OS and Ubuntu MATE while accommodating both 32-bit and 64-bit images tailored for your Raspberry Pi model.
To guarantee smooth operation, keep these key points in mind:
- Supported Devices: It’s compatible with Raspberry Pi models 2 and newer, along with various microSD cards (minimum 8GB), ensuring you have enough storage for the OS installation.
- Software Versions: You’ll need Ubuntu 22.04 or later for the best experience. Mac users should be on macOS 10.15 or higher.
- Download Methods: Easily download it from the official Raspberry Pi website or install it via terminal commands on Ubuntu. Additionally, using the Raspberry Pi Imager ensures quick setup for immediate Raspberry Pi use. The recent updates improve both functionality and compatibility across different operating systems.
Despite its robust features, you should be aware of potential compatibility issues, especially if you’re using older versions or hardware. Regular updates maintain the imager’s functionality and improve compatibility over time, guaranteeing that you’ll always have the latest tools at hand to release your creativity and innovation, such as setting up a programming environment in Raspbian.
Usage Scenarios for Advanced Options

Exploring the advanced options in Raspberry Pi Imager opens up a world of tailored experiences for your projects. These settings enable innovative custom installation scenarios that streamline your setups, especially for headless installations.
By enabling SSH on boot, you can connect remotely without needing a monitor or keyboard. Plus, configuring WiFi credentials directly eliminates the cumbersome process of creating a ‘wpa_supplicant.conf’ file.
You also have the power to define your Raspberry Pi’s hostname and locale settings, making it easier to identify and connect within your network. Consider changing default usernames and passwords for enhanced security and utilizing public-key authentication for seamless, passwordless SSH access.
For those deploying multiple units, the advanced feature benefits are indispensable. You can save customized images, allowing for quick setups across various devices. Ensuring a stable network connection is crucial; set the correct country code in Raspberry Pi Configuration for compliance and connectivity.
Tips for Effective Configuration

When you’re setting up your Raspberry Pi headlessly, streamlining your configuration can save you time and frustration. Consistent settings across multiple devices make management simpler and more efficient. By utilizing the Raspberry Pi Imager, you can easily access advanced configuration options that enhance your setup experience. Let’s explore how to optimize your setup for a hassle-free experience.
Streamlined Headless Setup
To guarantee a smooth start with your headless setup, take advantage of the advanced options in Raspberry Pi Imager. This streamlined setup allows you to configure essential settings directly before writing your OS to the micro SD card, simplifying the headless installation process.
Here are a few key features you can utilize:
- WiFi Configuration: Enter your WiFi credentials to secure immediate network access without manual configuration later.
- SSH Activation: Enable SSH on boot, facilitating remote access right from the start and allowing for hassle-free management.
- Hostname Definition: Set a unique hostname for easy identification on your network using mDNS. Implementing a hostname configuration ensures easier connection to your Raspberry Pi without needing to remember an IP address. Additionally, utilizing the Raspberry Pi Imager ensures users can download the latest version of the OS automatically.
Don’t forget to press ‘CTRL + SHIFT + X’ to access the advanced menu. Make sure you’re using the latest version of the Pi Imager to access these features.
As you streamline your headless setup, also consider configuring the locale, time zone, and default user account settings. This customization guarantees that your Raspberry Pi is prepared for efficient operation as soon as it boots up, paving the way for your innovative projects.
Consistent Multi-Device Settings
Many users find setting up multiple Raspberry Pi devices a challenge, but consistent multi-device settings can simplify the process. By accessing the advanced menu in Raspberry Pi Imager—just press ‘CTRL + SHIFT + X’—you can configure essential settings before writing the OS. Options like setting hostnames, enabling SSH, and configuring WiFi boost your multi-device management.
You can also create custom usernames and passwords, enhancing security while ensuring consistent user experience across all your devices. Pre-configure WiFi settings, including SSID and password, and even hide your SSID for better privacy. This automatic setup eliminates manual configurations after the first boot, making your life easier. Additionally, the ability to save configurations allows for quicker setups during future sessions.
Don’t forget to adjust locale settings to standardize time zones and keyboard layouts, which further enhances a uniform experience. You can save these advanced configurations for future use, ensuring that every Raspberry Pi operates seamlessly and is easily identifiable on the network.
Streamlining your setup methodically not only saves time but fosters a more innovative approach to managing multiple devices effectively. With these tips, you’ll master consistent multi-device settings in no time.
Frequently Asked Questions
Can I Revert My Raspberry Pi Imager Settings to Default?
Yes, you can reset your Raspberry Pi Imager settings to default. Change the option to “for this session only” and restart the Imager, or delete the configuration file to clear saved settings.
Is There a Way to Save Raspberry Pi Imager Configurations for Future Installations?
Like a skilled artist preserving their palette, you can create a configuration backup within the advanced options. This lets you save your customized settings, making future installations simple and tailored to your needs.
What if My Raspberry Pi Doesn’t Boot After Using Advanced Options?
If your Raspberry Pi doesn’t boot after using advanced options, try boot troubleshooting methods, like adjusting display settings or ensuring proper image flashing. You can also explore recovery methods to resolve potential configuration issues.
Can I Customize OS Images Beyond the Provided Settings on Raspberry Pi Imager?
Yes, you can customize OS images beyond the provided settings by employing custom OS images for advanced customization. Explore various configurations and adjust settings to meet your innovative projects’ unique demands and specifications.
How Do I Update Raspberry Pi Imager to the Latest Version?
To update Raspberry Pi Imager, visit the official website or GitHub, download the latest compatible version, and install it. Regularly check for updates to guarantee ideal software compatibility and access new innovative features.
Conclusion
By mastering the Raspberry Pi Imager’s advanced options, you’re not just configuring a device; you’re crafting a bridge to endless possibilities. Each setting you tweak symbolizes a step toward innovation and creativity, transforming a simple board into a tool for your unique projects. Embrace the freedom that comes with customization and the ease of headless installations, and watch as your ideas take flight. With each project, you’re not just building; you’re shaping your future.

I am a retired software engineer with experience in a multitude of areas including managing AWS and VMWare development environments. I bought a relative a mini-PC a year ago and have become passionate about the technology and its potential to change how we deploy software.