
What Is the Best Way to Monitor a 12V Battery?
A Raspberry Pi voltage and current monitor can provide accurate checks on voltage and current flow. You can also observe instantaneous power, reactive power, and other metrics to gauge overall usage. When you measure these parameters, you prevent over-discharge and protect your electronics.
You should connect a Hall-effect sensor or similar module to your board. Then, import a Python library for reading input signals. This approach keeps you informed about the battery voltage. It also provides an open source environment for custom expansions. Whether you run a local webserver or rely on third-party tools, you’ll find plenty of software to support your needs.
Key Takeaways
- Hall-effect sensors simplify high-current measurements.
- Voltage dividers protect your Pi’s inputs.
- External ADC modules increase measurement accuracy.
- Python scripts log data for easy review.
- This approach suits many 12V battery projects.
How Does a Raspberry Pi Voltage and Current Monitor Enhance Your System?
A Raspberry Pi Voltage and Current monitor delivers critical data on power consumption. It can measure the voltage range and help with calculation of load, charging behavior, and maximum voltage thresholds. This feedback loop keeps your 12V battery healthy.
When you link your Raspberry Pi to a meter, you gain a deeper look at solar performance and can detect fluctuations fast. You can send data to an influxdb server or an MQTT broker for remote tracking. This transforms your system into a dynamic rpi-based station that logs voltage and current. If you’re looking for something more advanced, you could add a small microcontroller or specialized ADC chip for even more precise measurement.
Why Use an RPi for This Project?
Using a Raspberry Pi lets you run custom scripts, schedule tasks, and automate data logs. It also has a robust software side that’s easy to manage. You can store data locally or transmit it to a server.
The Raspberry Pi’s cpu can handle real-time calculations, or you can offload heavier graph generation to the cloud. If you’re new to coding, GitHub offers countless repositories to get started. It’s much easier to scale or adapt your setup when the platform is so flexible. This approach works for everything from basic logging to advanced power monitor analytics.
Which Sensor Do You Need for Measuring Voltage and Current?
Choosing the right sensor depends on your expected current and input voltage. Many hobbyists would love a simple Hall-effect sensor that reads both charge and discharge flows. This hardware provides isolation and keeps high current lines away from the Pi.
Use a specialized converter (e.g., an adc board) to convert analog signals to digital. Then you can connect them to the Pi’s gpio pins through an I2C connector. Ensure your board can handle the 3.3V signals. For a safe approach, solder strong cable connections and secure them to avoid short circuits.
- Raspberry Pi (Model 5 or similar): Offers I2C support and Python compatibility.
- Hall-Effect Current Sensor (ACS758 or ACS770): Measures ±100A with good isolation.
- Voltage Divider (two resistors): Lowers 12–14V to a Pi-friendly 3.3V.
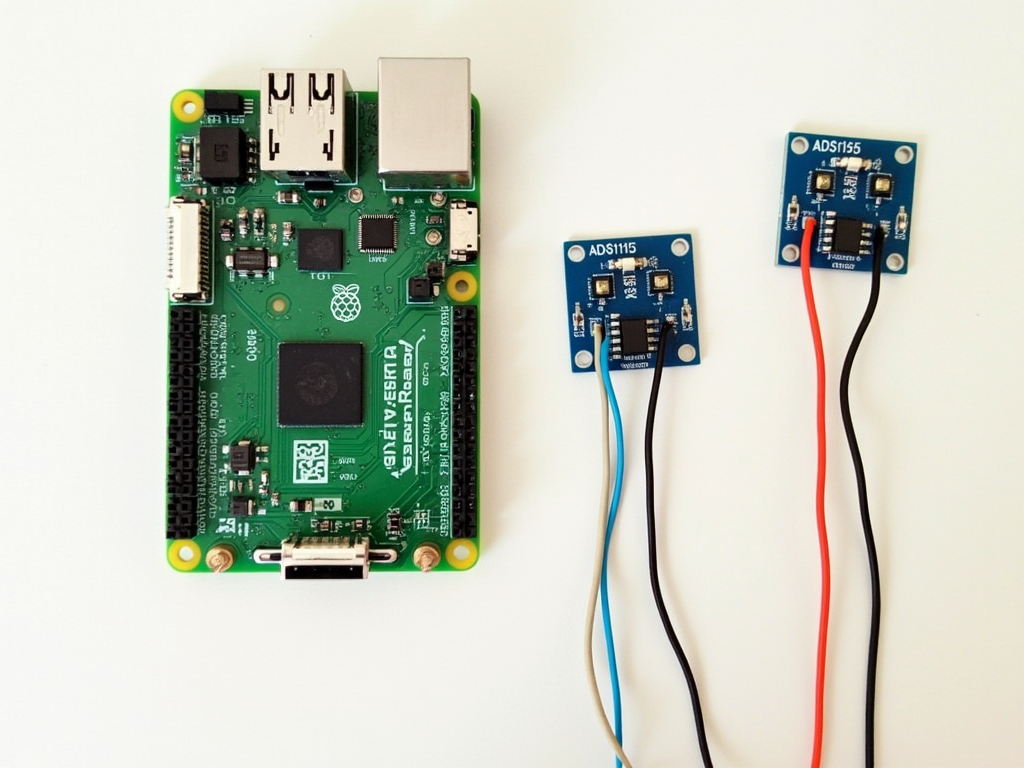
- External ADC (ADS1115): Converts analog sensor output into digital data.
- Wires and Breadboard: Ensure tight and organized connections.
How to Get the Right Output for Raspberry Pi Data Logging?
Accurate output hinges on stable reading of input channels. Calibrate your Raspberry Pi Voltage and Current monitor routine by checking baseline offsets. You can also track temperature variations to see if they affect readings. If so, adjust your code to calculate a correction factor.
Use Python scripts to send data to an open source graph tool. You might configure a local server or a remote mqtt feed. This allows for visualizing measurement trends. A good example is to parse logs on the command line or share them via wifi. Over time, you’ll notice how different loads consume battery resources.
- Current Measurement: A Hall-effect sensor outputs a voltage proportional to current.
- Voltage Scaling: A simple resistor divider lowers the battery’s voltage.
- Analog-to-Digital Conversion: The ADS1115 reads the analog signals and sends digital data via I2C.
- Data Logging: A Python script runs on your Pi, polling values and saving them to a file.
Trade-offs and Considerations
Each hardware choice affects cost, accuracy, and ease of setup. Think about these factors before finalizing your design.
- Hall-Effect vs. Shunt Resistor: Hall-effect modules cost more but offer easier wiring and safer isolation. Shunt resistors are cheaper but need careful calibration.
- Voltage Divider Values: Use larger resistor values to save power. However, higher values can introduce noise.
- External ADC vs. Built-In Solutions: The ADS1115 offers high resolution and flexibility. Some HATs include limited analog inputs, but may not handle high current measurements.
What Hardware Is Required for This DIY Setup?
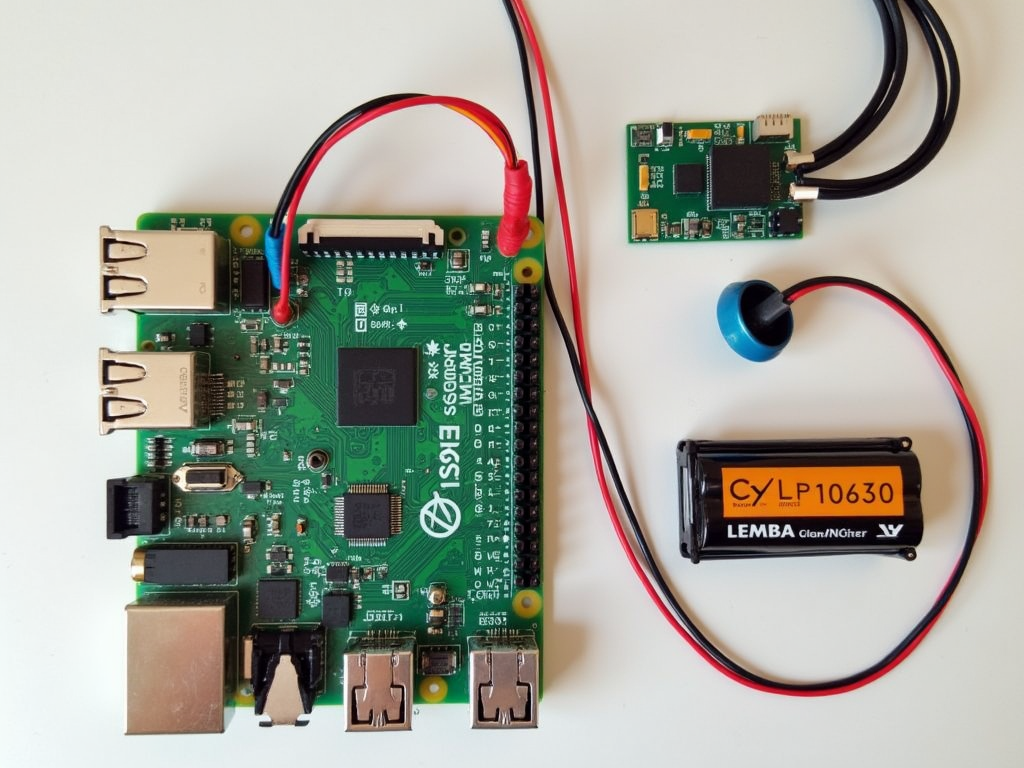
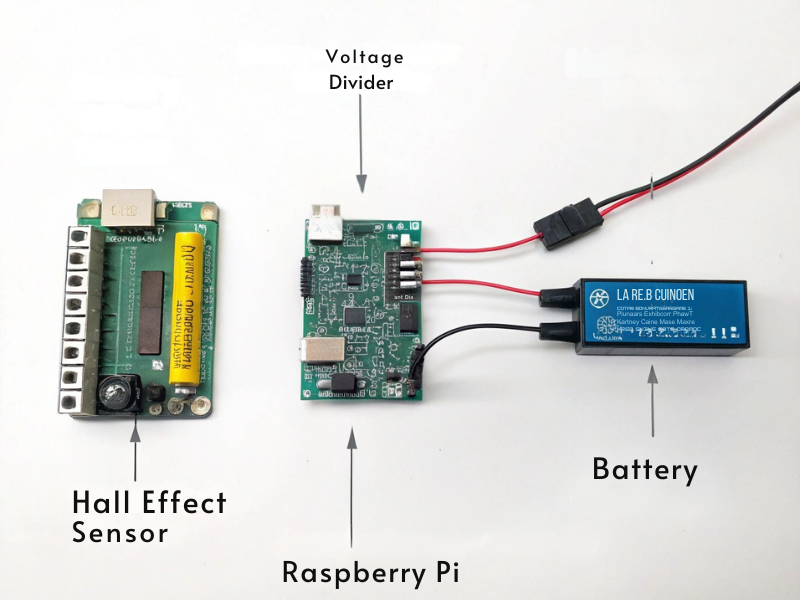
You only need essential hardware components to begin. A Raspberry Pi, a 12V battery, a Hall-effect sensor, and an adc module form your core kit. A stable 5V power supply ensures the Pi operates without interruption.
Plug all parts into a small breadboard or diy electronics rig. Secure each port with a reliable connector. Make sure your Pi has software support for I2C. Double-check your panel cables and ensure correct polarity on the 12V battery. Then connect the Pi through a usb port to either a local screen or a headless environment.
Building a raspberry pi voltage and current monitor takes a few simple steps. Power off your system before wiring. Confirm polarity and voltage ratings.
- Wiring the Hall-Effect Sensor
- Place the sensor in line with the battery connection.
- Provide correct power (3.3V or 5V, depending on the module).
- Building the Voltage Divider
- For a 12V battery, aim to reduce voltage to 3.3V or less.
- Example ratio: 10kΩ and 33kΩ, giving about 1:4.3 scaling.
- Connecting the ADS1115
- Wire outputs from the Hall-effect sensor and voltage divider to ADS1115 channels (A0, A1).
- Link SDA, SCL, and power lines with your Pi.
- Installing Software
sudo apt-get updatesudo apt-get install python3-pippip3 install adafruit-circuitpython-ads1x15
Finally, build a Python logging script. Here is a sample (needs the logfile code):
import timeimport boardimport busio import adafruit_ads1x15.ads1115 as ADS from adafruit_ads1x15.analog_in import AnalogIn
i2c = busio.I2C(board.SCL, board.SDA) ads = ADS.ADS1115(i2c) chan_voltage = AnalogIn(ads, ADS.P0) chan_current = AnalogIn(ads, ADS.P1) VOLTAGE_DIVIDER_RATIO = 4.3
# Adjust for your resistor values ACS_SENSITIVITY = 0.04
# V per A (check datasheet) V_OFFSET = 2.5
# Zero-current offset
while True:    raw_v = chan_voltage.voltage
    battery_voltage = raw_v * VOLTAGE_DIVIDER_RATIO
    raw_i = chan_current.voltage    current_amps = (raw_i - V_OFFSET) / ACS_SENSITIVITY
    timestamp = time.strftime("%Y-%m-%d %H:%M:$S")
    data_line = f"{timestamp}, {battery_voltage:.2f},{current_amps:.2f}\n"
        with open("/home/pi/voltage_current_log.csv", "a") as logfile:     logfile.write(data_line)
    time.sleep(60)
Can This Solve Common Solar Monitoring Challenges?
Yes, this approach can solve many solar system issues. You can keep track of charge cycles, track each measurement, and identify abnormal drops. If you see abnormal temperature spikes or a mismatch in real power, you’ll know quickly.
Combine a kill-a-watt meter at the outlet with your Pi logs to compare mains usage vs. your 12V battery supply. This helps you balance loads between reactive power and active consumption. If you encounter any hiccups, you can always reset the Pi or re-config your environment. A setup like this helps you be proactive with solar expansions and avoid surprises.
Final Thoughts
This Raspberry Pi Voltage and current monitor method helps you measure the voltage of a 12V battery accurately. You can expand it to track power consumption, temperature, and more. The Pi’s board offers ample support for advanced tasks like open source monitoring, local logging, or advanced cloud integration. Whether you want to charge with a raspberry pi or set up a full microcontroller farm, you’ll find plenty of ways to enhance your design.
It’s wise to keep everything organized, from your usb connections to your final data outputs. If you keep each terminal command simple and store logs in a known directory, you reduce confusion. With each successful reading, you gain insight into your system’s performance. This helps you grow your project into something bigger, whether that’s home automation, off-grid powering, or large-scale solar expansions.
Bonus Tips
- Always use 5V power for the Pi.
- Keep your wiring neat.
- A real-time data feed to an influxdb or other database adds deeper insights.
Frequently Asked Questions
Below are common questions about setting up a Raspberry Pi voltage and current monitori. These concise answers address typical concerns and boost your search visibility.
How do I display my data in charts?
Tools like Grafana or Matplotlib can visualize CSV logs. Install them on your Pi or another machine.
How accurate is a Hall-effect sensor?
Hall-effect sensors offer decent accuracy but can have slight offsets. Calibrate for better results.
Can I use a Pi without an external ADC?
Most Pi models lack analog inputs. An external ADC like the ADS1115 is recommended.
What resistor values are best for the voltage divider for a Pi ADC?
Aim for a ratio that scales your max voltage below 3.3V. Typical values: 10kΩ and 33kΩ.
Why measure both charging and discharging current on a Raspberry Pi ADC?
This identifies net battery flow and helps you track energy usage or detect issues.
Will a Raspberry Pi ADC work for a 24V battery system?
Yes, but adjust the voltage divider to reduce voltage to safe Pi levels.

I am a retired software engineer with experience in a multitude of areas including managing AWS and VMWare development environments. I bought a relative a mini-PC a year ago and have become passionate about the technology and its potential to change how we deploy software.