
How do you Secure Your Raspberry Pi via the Command Line?
Securing your Raspberry Pi effectively requires one to implement several critical command-line measures. Start by changing the default password using ‘passwd’ and configuring SSH with key-based authentication. Enable UFW firewall, restrict remote access, and maintain regular system updates through ‘apt-get’ commands. Set up automated backups with ‘rsync’ and monitor system logs for suspicious activities. These fundamentals establish a strong security foundation, with additional layers of protection ready to strengthen your defenses.
Key Takeaways
- Change default password using ‘passwd’ command and implement a strong password policy requiring at least 12 characters.
- Configure SSH security by changing default port, disabling root login, and implementing key-based authentication.
- Install and set up UFW firewall with strict rules, allowing only essential ports and services.
- Run ‘sudo apt update && sudo apt upgrade’ regularly and enable automatic security updates for critical patches.
- Monitor system logs in /var/log/auth.log and /var/log/syslog for suspicious activities and potential security threats.
Default Password Management
One of the most critical steps for securing your Raspberry Pi is changing the default password. The default ‘raspberry’ password is widely known, making your device vulnerable to unauthorized access.
Use the ‘passwd’ command in the terminal to set a new password that meets modern password complexity requirements.
Implement a strong password policy by creating a password with at least 12 characters, including uppercase and lowercase letters, numbers, and special characters.
Consider setting up password expiration to enforce regular changes every 90 days. You can configure this using the ‘chage’ command.
Remember to store your new password securely and never share it.
If you’re using your Pi in a network environment, consider implementing SSH key-based authentication for an additional layer of security.
User Permissions and Access Control
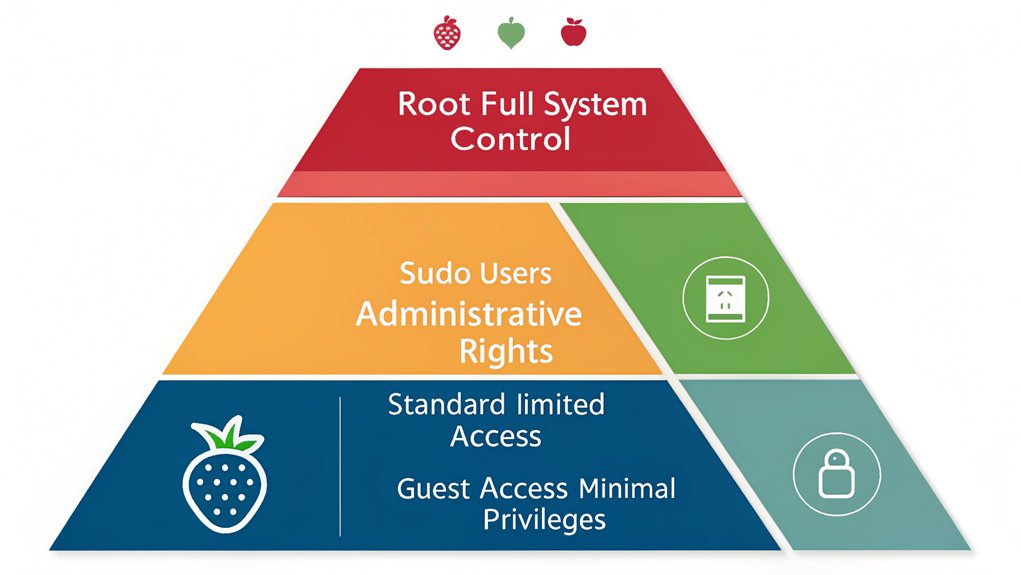
You’ll need to master both sudo privileges and user group management to maintain proper access control and securing your Raspberry Pi.
Before granting sudo access to any user, carefully evaluate the necessity and implement the principle of least privilege.
Managing user groups effectively lets you organize permissions systematically and control access to critical system resources.
Understanding Sudo Privileges
Managing sudo privileges effectively is vital for securing your Raspberry Pi.
You’ll need to understand proper sudo command usage and privilege escalation techniques to protect your system from unauthorized access and potential security breaches.
When configuring sudo privileges, consider these essential security measures:
- Limit sudo access to only trusted users who require elevated permissions
- Implement strong password policies for accounts with sudo privileges
- Configure sudo logging to monitor and audit administrative actions
- Set specific command restrictions using the sudoers file
Always verify user permissions before granting sudo access and regularly audit your sudo configuration.
Remember that each sudo command execution creates a potential security risk, so it’s important to maintain strict control over who can execute privileged commands and under what circumstances.
Managing User Groups
Proper user group management forms the backbone of effective access control on your Raspberry Pi system. Through strategic user role assignment, you’ll establish clear boundaries between system resources and user capabilities.
Use commands like “usermod” and “groupadd” to create and modify group structures that align with your security requirements. Implement the principle of least privilege by assigning users only to groups they absolutely need for their tasks.
You’ll want to regularly audit group memberships using “getent group” to identify and remove unnecessary access rights. For sensitive operations, create dedicated groups with specific permissions rather than relying on broad access categories.
Monitor group-based access patterns through system logs to detect potential security anomalies and adjust group permissions accordingly.
SSH Configuration and Security
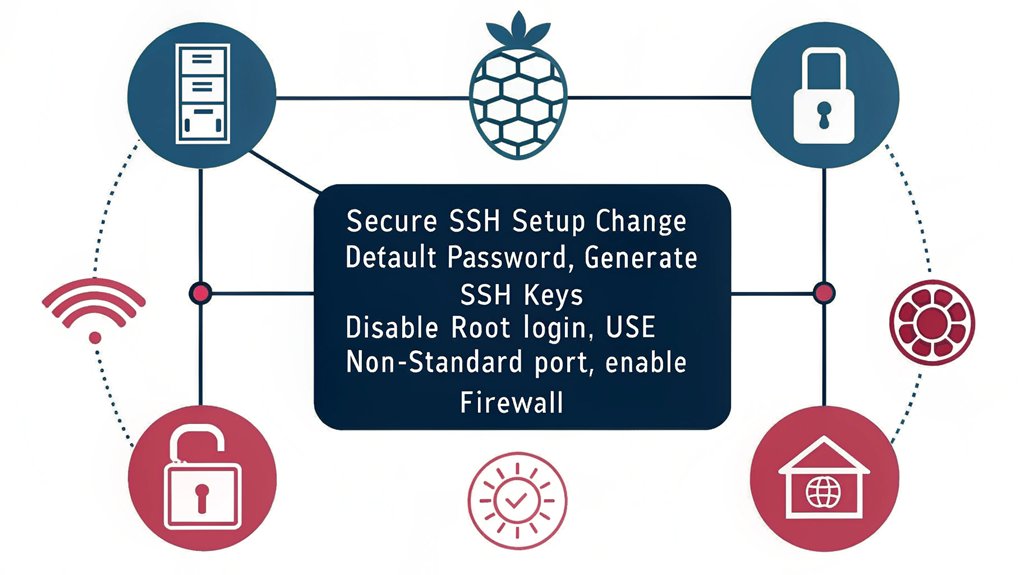
To establish secure remote access to your Raspberry Pi, you’ll need to enable SSH through the raspi-config tool while implementing critical security measures.
You should immediately change the default SSH port (22) to a non-standard port number between 1024 and 65535, which helps reduce automated attack attempts.
For enhanced security, disable root SSH login by modifying the sshd_config file and setting “PermitRootLogin” to “no.”
Enable SSH Access
Secure SSH access serves as a fundamental requirement for remote Raspberry Pi administration.
To implement robust ssh hardening techniques, you’ll need to configure your system properly while following essential remote access protocols. Start by enabling SSH through the Raspberry Pi configuration tool or by creating a blank file named ‘ssh’ in the boot partition.
Here’s what you’ll need to do to enable SSH securely:
- Install OpenSSH server if it’s not already present using ‘apt-get install openssh-server’
- Enable the SSH service with ‘sudo systemctl enable ssh’
- Start the SSH service immediately using ‘sudo systemctl start ssh’
- Verify the service status by running ‘sudo systemctl status ssh’
Once enabled, you’ll want to immediately implement additional security measures like key-based authentication and custom port configurations to protect your Pi from unauthorized access.
Change Default Port
While changing SSH’s default port 22 isn’t a complete security solution, it considerably reduces automated scanning attacks and adds an extra layer of security through obscurity.
To modify the port, edit your /etc/ssh/sshd_config file and locate the “Port 22” line. Change it to an unused port number between 1024 and 65535.
Remember to update your port forwarding configurations and firewall rules to reflect the new port number. After making these changes, restart the SSH service to apply the modifications.
You’ll need to specify the new port when connecting: ssh -p
This change helps protect against basic port scanners and automated bots targeting default configurations, though you should still maintain strong passwords and key-based authentication for thorough security.
Disable Root Login
Beyond port configuration, disabling root login stands as a fundamental SSH security measure for your Raspberry Pi. By implementing root user restrictions, you’ll greatly reduce the attack surface available to potential intruders. This critical security step prevents direct root access while maintaining system functionality through proper user privileges.
To effectively disable root login and enhance login authentication methods:
- Edit the SSH configuration file using ‘sudo nano /etc/ssh/sshd_config’
- Locate the line containing “PermitRootLogin” and set it to “no”
- Add “AllowUsers” followed by your non-root username
- Restart the SSH service with ‘sudo systemctl restart ssh’
These changes force attackers to compromise a regular user account first, adding an extra security layer.
Remember to test your new configuration from a separate session before closing your current connection.
Network Firewall Setup
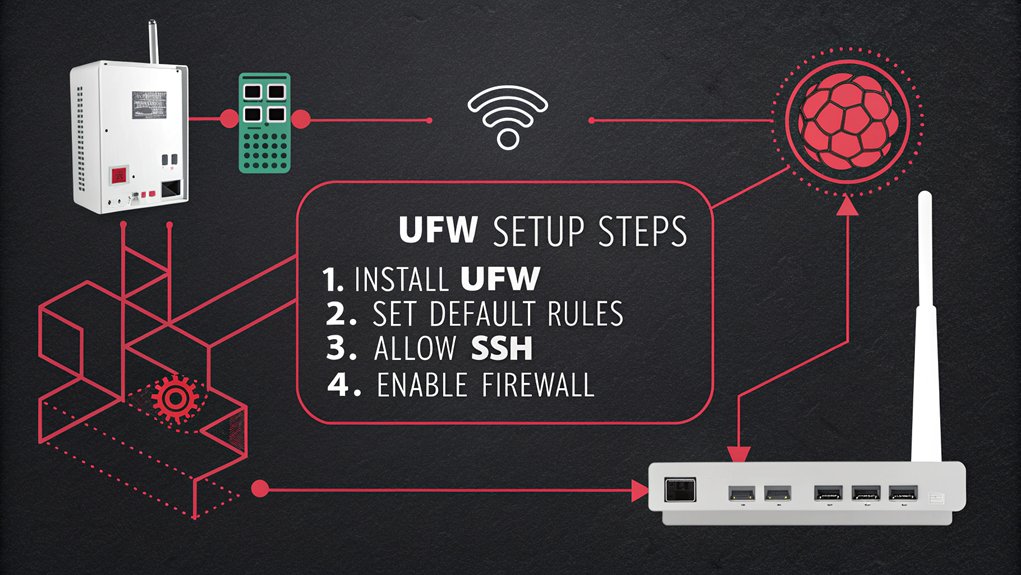
Setting up a robust network firewall on your Raspberry Pi forms a critical layer of defense against unauthorized access and potential cyber threats. Start by installing and configuring UFW (Uncomplicated Firewall), which provides a user-friendly interface for managing iptables rules.
Enable network traffic analysis by implementing basic rules that allow essential services while blocking unnecessary ports. You’ll want to establish strict ingress and egress filtering policies.
Effective network security requires carefully filtering both incoming and outgoing traffic while keeping essential services accessible and protected.
Configure your firewall to permit only required protocols and implement intrusion detection through tools like Snort or Suricata. These systems monitor incoming traffic patterns and alert you to suspicious activities.
Remember to regularly update your firewall rules to address emerging threats and maintain ideal security. For enhanced protection, consider implementing port knocking and rate limiting to defend against brute force attacks.
System Updates and Package Management

To maintain a secure Raspberry Pi environment, regular system updates and proper package management are essential defensive measures against vulnerabilities.
You’ll need to implement a systematic approach to package upgrades and dependency management to protect your system from potential security threats.
Key steps for maintaining your system’s security:
- Run ‘sudo apt update && sudo apt upgrade’ daily to synchronize package lists and install available updates
- Enable automatic security updates through ‘unattended-upgrades’ to patch critical vulnerabilities
- Monitor package dependencies regularly to identify and resolve potential conflicts
- Remove unused packages and clean package cache using ‘apt autoremove’ and ‘apt clean’
These practices will help minimize exposure to known exploits while ensuring your Raspberry Pi operates with the latest security patches and stable package versions.
Monitoring System Logs
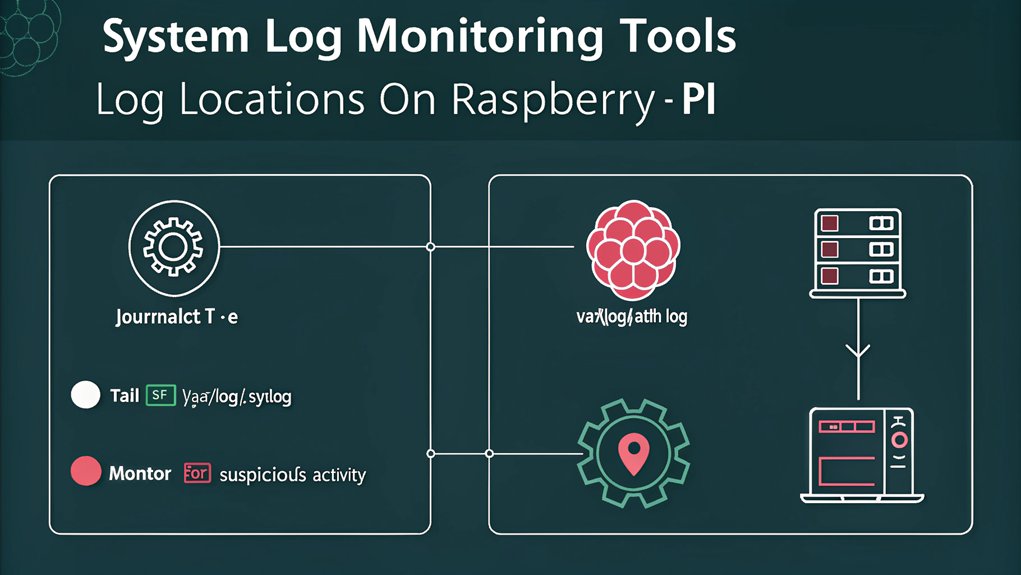
Regular system monitoring through log analysis complements your update management strategy by providing visibility into potential security threats and system issues.
You’ll want to focus on key system logs like /var/log/auth.log for authentication attempts and /var/log/syslog for general system events.
Implement automated monitoring tools to streamline your log file analysis process. Tools like ‘logwatch’ or ‘fail2ban’ can alert you to suspicious activities and potential security breaches.
Set up real-time monitoring for critical events by using ‘tail -f’ command or configuring log rotation policies to manage storage efficiently.
Create custom filters to identify specific patterns or anomalies in your logs. You can use ‘grep’, ‘awk’, or ‘sed’ commands to parse log files and extract relevant security information for further analysis.
Securing Your Raspberry Pi Through Remote Access Points

Since remote access points represent common security vulnerabilities, you’ll need to implement strict controls to protect your Raspberry Pi from unauthorized access.
Configure your remote desktop settings with rigorous authentication and enable VPN usage to create an encrypted tunnel for all remote connections.
Key security measures to implement:
- Set up two-factor authentication for all remote access attempts
- Configure your VPN to use strong encryption protocols like OpenVPN or WireGuard
- Restrict remote desktop access to specific IP addresses
- Implement strict firewall rules that only allow essential ports
Backup and Recovery Strategies
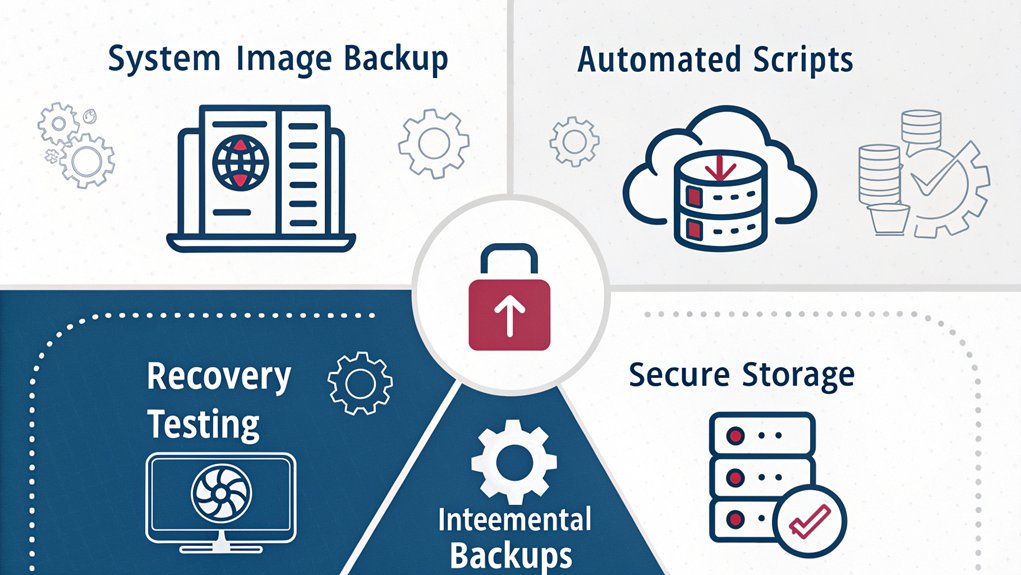
While securing remote access protects against external threats, data loss remains a significant risk that requires thorough backup protocols.
Protecting remote access is crucial, but organizations must also implement robust backup protocols to safeguard against devastating data loss.
You’ll need to implement a detailed backup strategy that guarantees data redundancy across multiple storage locations. Set up automated backups of your critical configurations, databases, and user data using rsync or dd commands.
Create a disaster recovery plan that includes regular testing of your backup integrity. You should maintain at least three copies of essential data: one local, one external, and one off-site.
Configure automated scripts to perform incremental backups during low-usage periods, and verify that your restoration procedures work as expected. Document your backup processes and store these instructions in a secure location that’s separate from your primary system.
Product Suggestions
After implementing these essential security practices, you might be wondering what tools and accessories can further enhance your Raspberry Pi’s resilience. Whether you’re building out a more robust home lab, adding physical security layers, or preparing for long-term maintenance, the right hardware and software can make your security efforts more effective and your setup more reliable. Here are a few products that can help you take your Raspberry Pi hardening to the next level.
Note that these are affiliate links. As an Amazon Affiliate, I might make a small commission on every purchase. No extra cost to you, and it helps to support this blog.

- Compatibility - GeeekPi Case is designed for the latest Raspberry Pi 5 4GB/8GB board.
- Armor Lite V5 Cooler - Pi 5 Armor Lite V5 Cooler combines aluminum heatsink and PWM fan. Different from ordinary fans, the PWM fan supports PWM speed regulation, which is perfectly compatible with...
- Pi 5 Case - GeeekPi Raspberry Pi 5 Case is made of lightweight ABS material. The removable top cover design can access to GPIO and camera connectors easily. It can accurately access to all ports,...

- CanaKit Power Supply for the Raspberry Pi 5
- Power Delivery (PD) Support, including 5V / 5A (27W) specially designed for Pi 5 and up to 45W for other devices
- UL Listed

- ✅Adopts pogo pins connector design, compatible with Raspberry Pi 5 / 4B / 3B+
- ✅Onboard Type-C port with bi-directional fast charging, supports multiple charging input / output protocols such as PD3.0, up to 40W charging power. Onboard battery fuel gauge IC for reading battery...
- ✅Supports I2C bus communication for monitoring the operating status of Type-C port and batteries in real time. Supports 4× 21700 Li batteries (NOT included), larger capacity and longer battery life

- Tevault, Donald A. (Author)
- English (Publication Language)
- 620 Pages - 02/28/2023 (Publication Date) - Packt Publishing (Publisher)
Frequently Asked Questions
How Can I Completely Disable USB Ports on My Raspberry Pi?
You’ll need to modify /boot/config.txt by adding ‘dtoverlay=disable-usb’ to disable all USB ports on your Raspberry Pi. Reboot to activate this hardware-level security measure.
What’s the Best Way to Encrypt the Entire Raspberry Pi Storage?
By Zeus’s lightning, you’ll want LUKS for full disk encryption on your Pi. Set up encryption options during initial installation or use dm-crypt to encrypt existing partitions for maximum data protection.
Can I Set up Two-Factor Authentication for My Raspberry Pi Console Login?
You can enable two-factor authentication using Google Authenticator or other authentication apps. Install ‘libpam-google-authenticator’, run configuration commands, and modify PAM settings to require 2FA during login.
How Do I Detect and Block Potential Brute Force Attacks?
Like a fortress guarding against invaders, you can install Fail2ban to monitor logs and automatically block IP addresses showing suspicious login patterns, while configuring SSH settings to limit authentication attempts.
Conclusion
You’ve learned essential command-line practices for hardening your Raspberry Pi’s security posture. While implementing these measures might seem time-consuming, consider the cost of a potential breach: data loss, system compromise, and network infiltration. By following this systematic approach – from password management to backup strategies – you’ll create multiple layers of defense that considerably reduce your Pi’s attack surface and maintain operational integrity.

I am a retired software engineer with experience in a multitude of areas including managing AWS and VMWare development environments. I bought a relative a mini-PC a year ago and have become passionate about the technology and its potential to change how we deploy software.