
Best Practices for Virtualizing Mini PCs: Unlock Maximum Efficiency
Managing virtualized mini PC environments requires that you should prioritize performance by selecting powerful CPUs, adequate RAM, and fast SSD storage. Choose a suitable hypervisor that aligns with your workload needs, and guarantee proper networking configurations for seamless VM communication. Regularly allocate resources based on application demands and implement robust backup and snapshot strategies for data protection. Monitor your system’s performance to identify optimization opportunities, and stay updated with security best practices to safeguard your environment. Explore further strategies to maximize your virtualized mini PC setup.
Key Takeaways
- Choose powerful CPUs, sufficient RAM, and SSD storage to optimize VM performance.
- Select a hypervisor that fits your workload and budget.
- Implement robust backup and snapshot strategies to protect data.
- Monitor resources and adjust as needs grow.
- Prioritize security measures to safeguard your virtual environment.
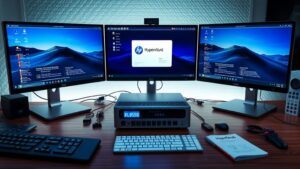
Advantages of Mini PCs for Virtualization
Maximizing efficiency in virtualization environments often leads professionals to contemplate Mini PCs as a viable solution. These compact devices offer a host of advantages specifically suited for virtualization needs. Their compact design allows them to fit seamlessly into limited spaces, whether on desks or tucked behind monitors, making them ideal for small businesses seeking to optimize workspace.
Additionally, sustainable solutions for virtualization are increasingly important as demand rises.
Mini PCs are particularly energy-efficient, consuming much less power than traditional desktops or servers. This feature not only cuts down on operational costs but also aligns with sustainability goals, appealing to eco-conscious users. Furthermore, they tend to be more cost-effective than high-end desktop or server alternatives, enabling you to implement virtualization without straining your budget.
The versatility of Mini PCs is another strength; they can be tailored for various workloads, from basic testing to handling powerful production tasks. Many models boast quiet operation, thanks to fanless designs or low-noise cooling solutions, a vital aspect for noise-sensitive environments.
With powerful configurations that enhance resource utilization, Mini PCs become a transformative tool for professionals looking to innovate in their virtualization strategies.
Selecting the Right Mini PC

When selecting the right Mini PC for virtualization, focus on CPU performance, RAM capacity, and storage options.
A mini-PC with enhanced processing power supports complex virtualization tasks, making it an ideal choice for diverse applications across sectors. You’ll want a powerful CPU with virtualization support to effectively run multiple VMs, paired with at least 16 GB of RAM to prevent performance issues.
Additionally, consider SSD storage for faster data access and guarantee there’s room for scalability as your needs grow. By investing in a capable system, you can maximize your mini-PC’s utility and take advantage of top virtualization packages for mini-PCs available in 2024.
CPU Performance Considerations
Choosing the right Mini PC for virtualization hinges on critical CPU performance factors. First, prioritize CPUs with multiple cores and high clock speeds; these features enable effective handling of resource-intensive tasks and multiple virtual machines (VMs).
Look for Mini PCs supporting virtualization technologies like Intel VT-x or AMD-V, which greatly enhance CPU performance and improve efficiency in running VMs. Recent advancements in Intel and AMD CPU performance further emphasize the importance of selecting processors that leverage the latest innovations for ideal results.
Consider opting for the latest generation CPUs, such as Intel Core i5/i7 or AMD Ryzen 5/7, since they deliver considerable improvements in processing power and energy efficiency compared to older models.
Be mindful of the thermal design power (TDP) of your selected Mini PC; verify it aligns with your workload requirements because higher TDP CPUs often necessitate advanced cooling solutions to maintain peak performance.
Additionally, evaluate benchmark scores like PassMark or Cinebench. These scores provide valuable insights into CPU performance, helping you choose a Mini PC that meets your virtualization environment’s expectations.
RAM Capacity Requirements
For effective virtualization in a Mini PC environment, selecting the right RAM capacity is vital. You’ll want to make sure that your setup can handle your workload, especially if you’re running multiple virtual machines (VMs).
Understanding specific use cases is important, as it helps in determining the ideal RAM configuration for your needs. Here are some key considerations:
- Minimum RAM Requirements: For basic tasks, 8 GB of RAM is the minimum, while 16 GB or more is ideal for multiple VMs.
- Resource-Intensive Applications: Consider the RAM requirements of each VM. A Windows Server typically needs at least 2 GB, but resource-intensive applications can require 4 GB or more per VM.
- Expandable RAM Options: Opt for Mini PCs with expandable RAM slots for future-proofing your environment. This flexibility allows you to adjust memory as your virtualization needs grow.
Additionally, make sure your Mini PC supports dual-channel memory configurations to enhance memory bandwidth and performance in virtualized settings.
Regularly monitor RAM usage through virtualization management tools; consistently high memory utilization could signal a need for more RAM or better VM optimization.
Storage Options Analysis
Selecting the right storage options for your Mini PC is essential in optimizing virtualization performance and enhancing data management. Start with sufficient internal storage capacity, ideally a 256 GB SSD, to support multiple virtual machines (VMs) and their extensive data needs.
Consider leveraging external storage solutions, such as USB 3.0 or Thunderbolt drives. These can provide additional space and redundancy, simplifying backup solutions and enabling larger VM setups.
Prioritize Mini PCs equipped with NVMe storage to guarantee rapid data access speeds, greatly improving VM performance and minimizing latency compared to traditional SATA drives.
Evaluate RAID configurations, like RAID 1, to guarantee data redundancy and protect against drive failures in your virtualized environment. This approach offers peace of mind as you manage critical data.
Lastly, ensure compatibility with cloud storage integrations. These solutions facilitate easier management of VM backups while providing scalable storage that evolves with your virtualization needs.
Choosing Your Hypervisor

When choosing your hypervisor, it’s essential to understand the different types available and their respective performance characteristics.
You’ll also need to evaluate licensing and cost implications to guarantee your selection aligns with your budget and operational needs.
Making an informed decision will enable you to optimize your virtualized Mini PC environment effectively.
Hypervisor Types Overview
Choosing the right hypervisor is crucial for optimizing your virtualized mini PC environment. The hypervisor you select impacts not just performance, but also the management capabilities and support for diverse guest operating systems.
Here’s a quick overview of three types that might suit your needs:
- VirtualBox: This open-source hypervisor is user-friendly and perfect for smaller setups and beginners. It supports a wide range of guest operating systems, making it a versatile choice for small businesses.
- VMware Workstation: Designed for professional use, VMware Workstation provides advanced features and robust performance metrics. It’s particularly effective for testing and development scenarios, ensuring high reliability.
- Proxmox Virtual Environment: Proxmox offers a powerful platform that combines virtualization and containerization. It supports both KVM and LXC, making it ideal for more complex setups that require flexibility.
Additionally, if your needs escalate, consider enterprise solutions like Hyper-V, which integrates seamlessly with Windows environments and provides extensive management capabilities.
Choosing the right hypervisor is crucial for leveraging innovation in your virtualized operations.
Performance Considerations
Performance in a virtualized mini PC environment hinges on the hypervisor selected, as it directly affects how well resources are allocated and managed. When choosing a hypervisor, consider the CPU and RAM requirements of your workloads. Resource-intensive tasks demand hypervisors that excel in performance monitoring and resource allocation.
For beginners, VirtualBox provides a user-friendly interface suitable for smaller setups. If your focus is on development and testing, VMware Workstation offers advanced features to enhance your experience.
For diversified workloads requiring both virtualization and containerization, Proxmox Virtual Environment stands out, allowing efficient management across different application types. If you’re operating in a Windows-based environment, Hyper-V seamlessly integrates with Microsoft products and is ideal for organizations already invested in that tech stack.
Ultimately, the right hypervisor is essential for maintaining exemplary performance. Utilize performance monitoring tools, such as vRealize Operations Manager, to gain insight into your virtual machines’ performance. This will help you pinpoint under- or oversized VMs and make certain your resource allocation aligns with your operational demands, driving efficiency and innovation in your virtualized mini PC environment.
Licensing and Costs
Several factors shape the cost of implementing a hypervisor in your virtualized mini PC environment, with licensing models playing an important role.
Understanding these models is essential as they can greatly impact both initial costs and ongoing expenses. Here’s what you need to take into account:
- Licensing Models: Paid options like VMware Workstation require a one-time purchase, while VMware vSphere operates on a subscription basis, potentially increasing ongoing expenses.
- Open-Source Hypervisors: Choices like VirtualBox can be cost-effective, as they come with no licensing fees. However, they may lack some advanced features that paid hypervisors offer.
- Windows Server Licenses: If you’re already using Windows Server, Hyper-V may be a cost-efficient solution since it’s included in those licenses.
But remember, additional licensing may still be necessary for advanced features.
Always evaluate the total cost of ownership, including support, upgrades, and those extra features when reviewing hypervisors.
Such scrutiny guarantees you select an option that aligns with both your innovation goals and budget constraints, paving the way for an optimized virtualized environment.
Installing the Hypervisor
Installing a hypervisor on your Mini PC requires careful attention to hardware compatibility and specific setup procedures. First, confirm your hardware meets the minimum requirements for the hypervisor you choose, confirming that your CPU supports virtualization technologies like Intel VT-x or AMD-V.
Download the appropriate version of the hypervisor, such as VirtualBox or VMware Workstation, and follow the installation instructions provided by the vendor, as these vary between platforms. During installation, you’ll want to configure network settings and enable features that optimize performance for virtualization.
Once you’ve completed the installation, verify hypervisor functionality by checking its version and confirming it properly recognizes your Mini PC’s hardware resources, including CPU cores and RAM.
It’s also essential to install any additional virtual tools or drivers recommended by the hypervisor, as these enhance host-guest interactions and greatly improve the performance of virtual machines.
Configuring Virtual Machine Settings

When configuring virtual machine settings, you need to allocate resources efficiently to guarantee ideal performance.
Pay close attention to networking configurations, as they can greatly affect communication and security between your VMs and the host.
This foundational setup will prepare you for the next steps in guest OS installation and overall management.
Allocating Resources Efficiently
Efficiently allocating resources in a virtualized environment is essential for optimizing the performance of your virtual machines (VMs). To achieve this, focus on the following areas when configuring your VM settings:
- CPU Cores: Allocate CPU cores based on the specific workload requirements of each VM. Avoid overcommitting cores; assigning more than necessary can lead to performance degradation and increased resource contention.
- Adequate RAM: Confirm each VM has adequate RAM, starting with at least 512 MB for lightweight tasks. Adjust this according to the anticipated application usage, confirming smooth operation without memory bottlenecks.
- Virtual Hard Drives: Use virtual hard drives with sufficient storage capacity. Depending on the applications and data managed, individual VMs may require anywhere from 8 GB to several hundred GB.
Implement resource reservation settings to guarantee that critical VMs have access to essential CPU and memory resources.
Regularly utilize monitoring tools to track performance metrics like CPU usage and memory ballooning. Adjust VM settings as needed to optimize resource allocation, reducing the risk of overcommitment.
This proactive approach confirms stability and improved performance across your virtualized environment.
Networking Configuration Essentials
Getting networking configuration right is essential for the performance and stability of your virtualized mini PC environment. Start by allocating an appropriate number of CPU cores and sufficient RAM to each VM according to workload requirements. This prevents overcommitting resources and performance degradation caused by ballooning or swapping.
Use virtual networks to guarantee smooth communication between VMs and the host. When selecting the network adapter type, options like VMXNET 3 can enhance efficiency and performance. It’s equally important to implement network resource reservations for critical applications, thereby avoiding contention during peak usage periods.
Regularly monitoring network metrics is key. Track bandwidth usage and latency to identify potential bottlenecks and adjust your VM networking settings accordingly. This proactive approach elevates performance and guarantees a maximized mini PC environment.
| Aspect | Best Practice |
|---|---|
| CPU Allocation | Align cores with workload needs |
| RAM Allocation | Consider total Mini PC memory |
| Network Adapter Selection | Use VMXNET 3 for peak performance |
| Resource Reservations | Prioritize critical applications |
Guest OS Installation Steps
Setting up the guest OS in a virtual machine begins with careful configuration to confirm peak performance. To optimize your installation process, follow these essential steps:
- Allocate Resources: Start by assigning at least two CPU cores and a minimum of 512 MB of RAM to your VM. This guarantees the guest OS operates smoothly without performance bottlenecks.
- Configure Virtual Hard Drive: Create a virtual hard drive with a minimum of 8 GB storage. This space will accommodate the guest OS installation and its essential applications, ensuring you don’t run into storage issues later.
- Enhance Network Performance: Use VMXNET 3 network interface cards (NICs) for improved throughput and reduced latency. This choice notably boosts the network performance of your guest OS environment.
Also, prioritize clock synchronization using Network Time Protocol (NTP) to avoid operational errors in time-sensitive applications.
Once the installation is complete, don’t forget to install VMware Tools or compatible open-source alternatives. This step enhances guest performance and enables features like better graphics and shared folders, enriching your virtualized mini PC environment.
Creating and Managing Virtual Machines

Typically, when creating virtual machines (VMs) on a Mini PC, it’s vital to align CPU and RAM allocations with the specific workload requirements to avoid performance bottlenecks and resource contention. Start by evaluating the needs of your applications to determine ideal CPU and RAM allocations.
Utilize VM templates to standardize configurations, streamlining the deployment of new VMs while preventing resource over-allocation. This approach encourages ideal sizing from the outset, enhancing overall efficiency.
Establish effective network configurations, ensuring clear communication between VMs and the host. Setting up virtual switches and implementing correct IP addressing schemes is critical for operational integrity.
Regularly monitor performance metrics such as CPU usage and memory ballooning to identify potential under- or oversized VMs. This ongoing evaluation allows for timely adjustments, ensuring your environment remains efficient and responsive.
Additionally, schedule routine backups and snapshots of your VMs. These practices safeguard both data and configurations, enabling swift recovery in case of failures or security incidents, consequently maintaining operational continuity in your virtualized environment.
Networking in Virtualized Environments

How can effective networking enhance the performance of virtualized environments? Proper networking configuration is essential for guaranteeing your virtual machines (VMs) efficiently communicate with each other and the host system. Typically, this is managed through virtual switches and network adapters configured via the hypervisor.
Here are three best practices to optimize networking in your virtualized mini PC setup:
- Segment Traffic with VLANs: Implementing VLANs helps isolate and segment network traffic, enhancing both security and performance within your virtualized environment.
- Monitor Network Performance: Utilize network performance monitoring tools to track key metrics such as bandwidth utilization, latency, and packet loss. This proactive approach aids in identifying and resolving networking issues before they escalate.
- Optimize Virtual Network Interfaces: Using advanced virtual network interfaces, like VMXNET 3 on VMware, reduces overhead and boosts throughput compared to standard network adapters.
Regularly updating networking configurations and components guarantees compatibility with the latest hypervisor features and security protocols, thereby creating a secure and robust virtualized environment.
Backup and Snapshot Strategies

In today’s complex virtualized environments, effective backup and snapshot strategies are crucial for data integrity and system recovery. You should implement a backup strategy that leverages VM-based backups, which capture only essential metadata. This approach guarantees quick recovery while minimizing storage space usage.
Regularly scheduling snapshots of your virtual machines creates recovery points, allowing for easy rollbacks in case of system failures or data corruption.
Utilizing incremental backups is another smart move, as it reduces the amount of data transferred and stored, optimizing both backup time and storage requirements. This method helps maintain system performance while safeguarding critical information.
Make certain your backup solution supports individual file restores. This enhances flexibility and restore capabilities, eliminating the need to revert the entire virtual machine when only specific data is required.
Security Best Practices

To safeguard your virtualized mini PC environments, it’s crucial to adopt robust security best practices. Implementing effective measures will help minimize vulnerabilities and maintain business continuity.
- Access Controls & User Authentication: Strengthen your access controls by integrating multifactor authentication (MFA) for both the host and guest environments. This guarantees that only authorized users can access sensitive data, reducing the risk of breaches.
- Regular Updates: Keep your hypervisor and guest operating systems up to date. Regular updates patch vulnerabilities and apply security enhancements, making it harder for potential threats to exploit weaknesses.
- Network Segmentation: Isolate virtual machines and critical resources through network segmentation. This strategy limits lateral movement within your environment, making it more difficult for attackers to access more significant assets in the event of a security incident.
In addition to these practices, conduct periodic security audits and vulnerability assessments to identify potential issues proactively.
Establish a robust backup and recovery strategy, including regular snapshots and offsite backups, to protect against data loss and guarantee seamless recovery in any scenario.
Future-Proofing Your Setup

Future-proofing your setup is essential for staying ahead in the rapidly evolving landscape of virtualization. To achieve this, prioritize Mini PCs with upgradeable components like RAM and storage. This allows your system to adapt to increasing virtualization demands over time.
Invest in virtualization software that supports emerging technologies and boasts a strong community backing for timely updates. Regularly assess your virtualized environment to identify performance bottlenecks, ensuring you plan for necessary hardware or software upgrades proactively.
Incorporate scalable cloud solutions alongside your Mini PC setup for seamless integration of additional resources without overhauling your infrastructure. Staying informed about advancements in virtualization technologies is vital to align your setup with future innovations and industry standards.
Here’s a table highlighting key components for future-proofing:
| Aspect | Importance | Action Required |
|---|---|---|
| Upgradeable Components | Adapts to virtualization demands | Select Mini PCs with RAM & storage options |
| Virtualization Software | Supports emerging technologies | Choose software with active community support |
| Performance Assessment | Identifies bottlenecks | Regularly benchmark your environment |
Maximizing Your Virtualized Mini PC Environment: Key Strategies for Success
In the vibrant landscape of virtualization, managing your mini PC environments can be like painting a masterpiece. By selecting the right hardware, configuring your hypervisor, and implementing robust security measures, you create a seamless, efficient workspace. Imagine the peace of mind that comes from knowing your backups are secure and your setup is future-proof. Embrace these best practices and watch your virtual environment flourish like a well-tended garden, ready to grow with your evolving needs.
Questions? We Have Answers.
Get answers to a list of the most Frequently Asked Questions.

I am a retired software engineer with experience in a multitude of areas including managing AWS and VMWare development environments. I bought a relative a mini-PC a year ago and have become passionate about the technology and its potential to change how we deploy software.