
The Tiny Titan: Building Your Personal Cybersecurity Fortress on a Raspberry Pi
In a world where digital threats lurk around every corner of the internet, what if your strongest defense could fit in the palm of your hand? Enter the humble Raspberry Pi—that credit-card-sized computer that’s quietly revolutionizing home cybersecurity. For less than the cost of a decent dinner out, you can transform this miniature marvel into a powerful cybersecurity command center that rivals professional setups costing thousands more.
Imagine having your own personal digital laboratory where you can detect intruders before they strike, analyze suspicious network behavior in real-time, and master the same tools used by security professionals worldwide—all powered by a device that sips electricity and whispers rather than roars. Whether you’re a cybersecurity novice looking to break into the field or a seasoned professional wanting a home sandbox for testing, a Raspberry Pi cybersecurity lab offers the perfect blend of accessibility, power, and endless learning possibilities.
Ready to turn that innocent-looking Raspberry Pi into your personal cybersecurity guardian? Let’s dive into creating a lab that’s as powerful as it is compact, where you’ll learn to think like both the hunter and the hunted in the digital wilderness.
Key Takeaways
- Choose a Raspberry Pi model (3B+/4) and ensure proper cooling with heat sinks and fans to prevent overheating during use.
- Install a security-focused Linux OS, such as Raspbian Lite, on a minimum 16GB microSD card using Etcher for initial setup.
- Implement IDS tools like Snort or Suricata to monitor network traffic, and configure them for enhanced visibility beyond the firewall.
- Utilize penetration testing tools like Kali Linux, Metasploit, and Wireshark to conduct vulnerability assessments and analyze network traffic.
- Engage with learning resources and community forums to enhance skills and knowledge in cybersecurity practices and Raspberry Pi configurations.
Setting Up the Lab Environment
Setting up your Raspberry Pi cybersecurity lab involves several critical steps to guarantee top performance and security.
Begin with your lab layout; position your Raspberry Pi 3B+ or 4 in a well-ventilated area to avoid overheating, and consider adding heat sinks and a fan for ideal cooling. Confirm all necessary components, like a reliable power supply and an Ethernet cable, are readily accessible.
For software selection, choose a security-focused Linux distribution such as Raspbian Lite or Ubuntu Server. These options not only provide robust security features but also come with strong community support, assuring you have access to regular updates. Additionally, ensure you include essential files for lab setup from the repository, which will assist in organizing your environment effectively. To enhance your lab’s defense, regularly update system packages with commands like ‘sudo apt update’ and ‘sudo apt upgrade’.
Utilize Etcher to flash your chosen OS onto a minimum 16GB microSD card, which you’ll then insert into your Raspberry Pi. After booting the device, configure it to automatically download security updates, enhancing your lab’s defense against vulnerabilities.
Lastly, verify your network connection is secure by managing ports and implementing VPNs for remote access.
Essential Services and Tools
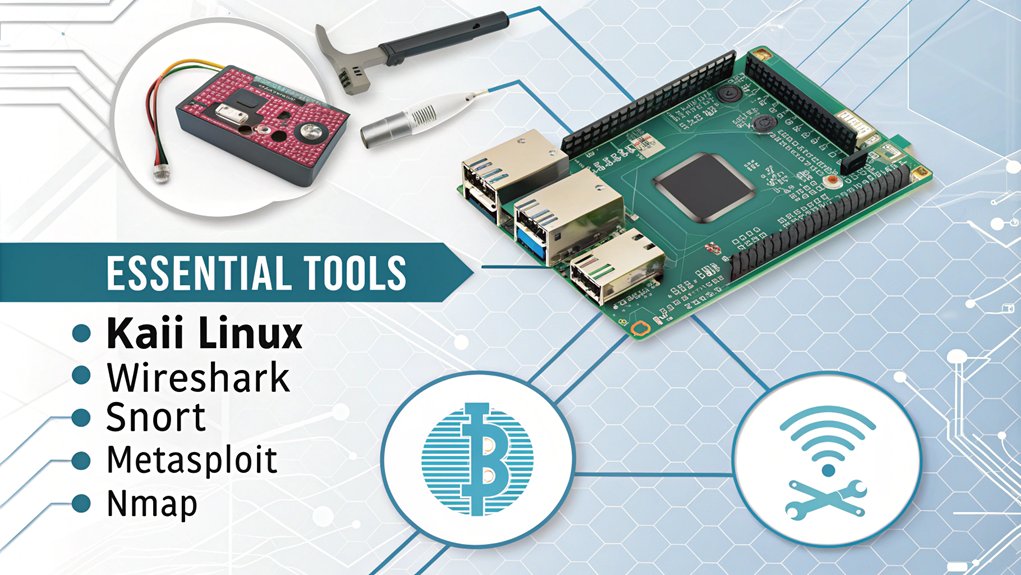
With a solid lab environment established, you can now focus on integrating key services and tools that enhance your Raspberry Pi’s cybersecurity capabilities. Start by implementing an Intrusion Detection System (IDS) like Snort or Suricata to monitor network traffic. This will aid in malware analysis and threat modeling, allowing you to define rules for detecting suspicious activities. Coupling this with firewall configurations using iptables will enhance your incident response strategy. Additionally, the device’s versatility makes it an excellent choice for various cybersecurity applications. Furthermore, consider using a Raspberry Pi Intrusion Detection System (IDS) to actively monitor for potential threats and vulnerabilities in real-time.
Next, install Kali Linux for penetration testing and vulnerability assessments. Utilize tools such as Metasploit and Nmap for risk assessment and ethical hacking exercises. Wireshark will assist in forensic analysis, capturing packets to identify vulnerabilities.
How to Install NMAP on a Raspberry PiLastly, explore cryptography by using OpenSSL to implement data protection measures. Understanding encryption protocols will bolster your security policies and compliance frameworks.
Here’s a summary of essential tools:
| Type | Tool/Service |
|---|---|
| IDS | Snort/Suricata |
| Penetration Testing | Kali Linux |
| Vulnerability Assessment | Metasploit/Nmap |
| Encryption | OpenSSL/GnuPG |
Integrating these tools effectively will elevate your cybersecurity lab to new heights.
Advanced Cybersecurity Projects
Advanced cybersecurity projects leverage the unique capabilities of the Raspberry Pi to create robust security solutions that can adapt to evolving threats. By integrating advanced threat detection systems, you can analyze network traffic using tools like Snort or Suricata, enhancing your proactive defense strategies. Implementing ethical hacking techniques, such as vulnerability assessment methods and penetration testing frameworks, allows you to identify and mitigate potential risks effectively. Incorporating malware analysis tools can streamline incident response planning, providing you with the insights needed to counteract breaches swiftly. Additionally, you can set up a home lab for hands-on experience with various cybersecurity tools and techniques.
Developing security policies that align with security compliance standards is critical for maintaining a secure environment. Utilizing forensic analysis practices on the Raspberry Pi can further bolster your cybersecurity posture. Regular security training is essential for users to understand common cyber threats, ensuring everyone is equipped to recognize and respond to potential risks.
You might consider deploying honeypots to gather intelligence on intrusion attempts, while AI-driven anomaly detection can offer predictive insights into potential threats. By adopting full disk encryption and secure external storage, you can safeguard sensitive data against unauthorized access. Ultimately, these advanced projects not only enhance your security framework but also prepare you to tackle the complex challenges of today’s cyber landscape effectively.
Offense and Defense Training
Transforming your Raspberry Pi into a dual-purpose tool for both offense and defense in cybersecurity can greatly enhance your skill set. Start by installing Kali Linux to create an effective penetration testing environment. This setup allows you to implement offensive strategies such as vulnerability assessments and wireless penetration testing, enabling you to scan networks and exploit weaknesses ethically. Use tools like P4wnP1 ALOA for intelligent Ducky script attacks, enhancing your understanding of attack simulations. Additionally, the growing community and resources available for support can provide valuable assistance as you navigate your cybersecurity journey.
On the defensive side, configure your Raspberry Pi as an Intrusion Detection System (IDS) to monitor network threats. By placing it strategically within your network, you can analyze alerts, gaining insights into potential cybersecurity challenges. A Raspberry Pi is designed for computer science education, which makes it an ideal tool for learning about security practices.
Coupling this with a secure VPN server guarantees encrypted internet traffic, bolstering your incident response capabilities. Building a honeypot with tools like Cowrie will help you study attacker tactics, providing invaluable threat intelligence.
Network Security and Monitoring

In the domain of network security, applying traffic analysis techniques is essential for identifying anomalies and potential threats. You’ll configure Intrusion Detection Systems (IDS) to scrutinize network traffic and alert you to suspicious activities, ensuring your defenses remain robust. Integrating Security Information and Event Management (SIEM) data enhances your ability to correlate events and respond effectively to any detected incidents. Utilizing a Raspberry Pi Network Monitor allows you to effectively monitor incoming/outgoing traffic and track bandwidth usage in real-time. The Raspberry Pi Model B offers versatile features, making it an excellent choice for deploying network monitoring tools in your cybersecurity lab.
Traffic Analysis Techniques
Traffic analysis techniques are essential for maintaining robust network security and monitoring. By implementing packet capture methods, you can gather real-time data from your network devices, switches, and routers. Techniques like port mirroring or network taps facilitate this process, allowing you to collect packet headers, payloads, and metadata for detailed analysis.
Once captured, employing machine learning algorithms enhances anomaly detection by identifying deviations from established traffic patterns. You can utilize tools like Wireshark and Zeek on your Raspberry Pi to inspect network traffic, while solutions like NetFort and LANGuardian provide deeper insights into packet content. Effective traffic analysis can reveal sensitive information through monitoring frequency and timing of network packets. Additionally, utilizing advanced threat detection capabilities can significantly improve your ability to identify and respond to potential cyber threats.
Incorporating both passive and active methods strengthens your analysis. Passive methods extract features from one side of the network, while active methods manipulate packet timings to link flows effectively. Tools like Cisco Stealthwatch leverage NetFlow data for robust security threat detection. Ensuring the mini PC used in the lab has sufficient RAM capacity is crucial for handling multiple VMs and intensive traffic analysis tasks. This setup also benefits from energy-efficient designs, such as those using low TDP processors, to minimize heat and power consumption.
With reliable alerts and data visualization, you’ll receive notifications for unusual network behavior, enabling timely responses to potential risks. Customizable reports consolidate historical and current data, offering thorough insights into network activity and security posture.
Embracing these techniques will notably enhance your cybersecurity lab‘s effectiveness.
IDS Configuration Essentials
When configuring an Intrusion Detection System (IDS) for ideal network security and monitoring, you need to take into account several key factors that will enhance its effectiveness.
First, optimal placement is vital; position your IDS beyond the firewall to reduce external noise while allowing it to analyze internal traffic. This strategy guarantees visibility into both incoming threats and internal communications. Integrating your IDS with firewalls can further enhance detection capabilities, as the integration of firewalls and IDS creates a robust security framework. Additionally, effective IDS configuration supports continuous monitoring, enabling timely detection of anomalies that may indicate a breach.
Next, focus on software configuration and maintenance. Install an appropriate IDS software like Snort or Suricata, and keep your rules and signatures updated to detect the latest threats. Automating these updates minimizes human error and guarantees timely responses.
Advanced detection features are also essential. Implement signature-based detection for known threats, and use heuristic analysis and anomaly detection to catch unfamiliar attacks. Regularly tuning your IDS settings based on security alerts will help align it with evolving network traffic patterns and reduce false positives.
Finally, customize your dashboard to display important metrics clearly, aiding in rapid response and effective monitoring.
SIEM Data Integration
Configuring an IDS lays the groundwork for robust network security, but integrating a Security Information and Event Management (SIEM) system takes your monitoring capabilities to the next level. A SIEM solution efficiently gathers data from diverse sources, including end-user devices, servers, and security hardware. This extensive data collection enables effective log management and anomaly detection, vital for identifying unusual activity. Moreover, SIEM systems are scalable to accommodate large amounts of data as organizations grow, ensuring that they can adapt to evolving threats.
Event correlation is a pivotal function of SIEMs, sifting through vast amounts of data to uncover intricate patterns indicative of potential threats. By leveraging advanced analytics, you can quickly identify successful and failed logins, malware behaviors, and other malicious activities that single events might miss. Moreover, SIEM systems are essential for organizations with remote workforces, as they provide visibility to mitigate network risks from various locations.
Real-time threat intelligence feeds enhance your SIEM’s capabilities, ensuring timely detection of new attack signatures. Furthermore, SIEM systems generate security alerts based on predefined rules, prioritizing responses according to event severity.
Integrating these systems with third-party threat intelligence platforms fosters a streamlined, centralized view of your network, facilitating deeper forensic analysis and compliance checks. By implementing effective integration strategies, you not only strengthen your security posture but also empower your incident response protocols.
Customization Options
When customizing your Raspberry Pi cybersecurity lab, it’s crucial to define your project scope and goals clearly. You’ll need to carefully select and integrate tools that align with your objectives, ensuring they enhance functionality without compromising security. Additionally, consider personalizing features to tailor the experience to your specific learning or operational needs, maximizing the effectiveness of your setup. For instance, incorporating a vulnerability scanner like Nessus can significantly improve your lab’s effectiveness in identifying and mitigating security risks. Furthermore, understanding the capabilities and limitations of Raspberry Pi as a hacking platform will help you make informed decisions about tool selection and integration.
Project Scope and Goals
The customization options in your Raspberry Pi Cybersecurity Lab project can greatly enhance your learning experience and skill set. By tailoring your lab to current cybersecurity trends, you’ll not only deepen your understanding but also conduct meaningful skill assessments.
For instance, configuring honeypots like T-Pot or OpenCanary allows you to monitor intrusion attempts, providing hands-on experience in threat analysis. Implementing an Intrusion Detection System (IDS) such as Snort or Suricata sharpens your ability to detect suspicious network activities. Utilizing AI inference with NPUs can enhance real-time anomaly detection without significant power consumption. This approach is similar to optimizing a Plex server for multiple streams, where transcoding capabilities are crucial for smooth performance.
In addition, setting up a VPN with PiVPN or WireGuard can teach you about secure remote connections, while tools like Pi-hole enable thorough network monitoring and ad-blocking. Integrating Docker can facilitate a homelab environment, giving you an opportunity to practice offensive security techniques. Furthermore, engaging in community-driven project sharing allows you to explore diverse range of applications for Raspberry Pi, which can enhance your lab’s functionality.
Additionally, by employing AI and machine learning tools for anomaly detection, you stay ahead of emerging threats. Each customization not only prepares you for real-world applications but also strengthens your resume, showcasing your proactive approach to cybersecurity. This proactive approach is analogous to centralizing media files with a whole-home Plex server, which simplifies maintenance with one computer instead of multiple devices.
Embrace these options to guarantee your lab serves as a robust training ground for your cybersecurity aspirations.
Tool Selection and Integration
How do you choose the right tools for your Raspberry Pi Cybersecurity Lab to maximize learning and effectiveness? Start by evaluating tool compatibility with the Raspberry Pi models you’re using.
For instance, Kali Linux is vital for penetration testing and ethical hacking, supporting tools like Metasploit, Nmap, and Wireshark. These tools enable thorough vulnerability scanning.
Network monitoring also plays an important role; consider integrating Snort or Suricata for real-time traffic analysis. Additionally, implementing a network intrusion detection system can further enhance your security monitoring capabilities.
However, integration challenges may arise. Make sure your selected tools can work together seamlessly.
For example, automating tasks with Python scripts can simplify the interaction between various tools, from vulnerability scanning to honeypot management.
Additionally, setting up a controlled network environment with IoT devices allows you to experiment with security measures, but guarantee these devices are well-integrated into your lab’s architecture.
Lastly, prioritize user-friendly interfaces for managing these tools, as ease of use can greatly enhance your learning experience.
Personalization and Features
Customizing your Raspberry Pi Cybersecurity Lab enhances its functionality and aligns it with your specific learning goals. Lab personalization allows you to tailor services like web, DNS, and FTP servers, optimizing them for unique testing scenarios.
For instance, configuring your Apache web server can facilitate hosting interactive websites, while tweaking its security settings can help you assess vulnerabilities.
Feature enhancements extend to DNS server customization, where you can define specific records, simulate vulnerabilities, and integrate logging for detailed analysis. The FTP server can also be fine-tuned, enabling anonymous logins to test common security flaws and monitor activities effectively.
Moreover, incorporating network monitoring tools like Suricata or Snort considerably enriches your lab. By customizing dashboard layouts and alert configurations, you can visualize metrics and respond to suspicious activities in real-time.
Implementing secure remote access via VPNs or SSH further fortifies your environment, ensuring a robust setup for experimentation.
Ultimately, these personalized configurations not only broaden your practical skill set but also create an immersive learning environment, preparing you for real-world cybersecurity challenges.
Engaging With the Community

Engaging with the Raspberry Pi community is vital for anyone looking to enhance their cybersecurity skills and knowledge. By participating in online forums like Raspberry Pi Forums and Reddit’s r/raspberry_pi, you can explore discussions around security threats and solutions. These platforms are invaluable for knowledge sharing and gaining security insights from diverse user experiences.
Don’t hesitate to ask questions and seek project feedback; this interaction fosters community collaboration that can greatly bolster your skill set.
Local networking also plays an important role. Attend Raspberry Pi user groups or meetups to connect with fellow enthusiasts and learn from their hands-on experiences. Workshops and conferences focused on cybersecurity offer opportunities to collaborate on group projects, enhancing collective skills.
Moreover, contributing to open-source projects related to Raspberry Pi security can be a game-changer. By collaborating on tools like Snort or Suricata, you not only refine your technical abilities but also gain exposure to testing and providing feedback on new security features.
Staying updated with community news, such as webinars and hackathons, further immerses you in threat discussions and emerging security trends, ensuring you’re always at the forefront of innovation.
Resources for Learning
A wealth of resources is available to enhance your cybersecurity skills using the Raspberry Pi. You can leverage various learning platforms, online courses, and community forums to deepen your knowledge. Here’s a curated table of resources that can guide your journey:
| Resource Type | Examples |
|---|---|
| Learning Platforms | Cybrary, Udemy, Coursera |
| Cybersecurity Books | “The Web Application Hacker’s Handbook”, “Hacking: The Art of Exploitation” |
| Video Tutorials | YouTube channels like NetworkChuck, The Cyber Mentor |
| Certification Programs | CompTIA Security+, Certified Ethical Hacker (CEH) |
Engaging with video tutorials and practical exercises can solidify your understanding of tools like Kali Linux and Wireshark. Hands-on labs enable you to practice concepts in a controlled environment, while community forums offer support and insights from experienced practitioners. Through these resources, you can effectively build a solid foundation in cybersecurity, ensuring you’re well-equipped to tackle real-world challenges. Embrace the innovation that the Raspberry Pi offers and immerse yourself in the diverse learning opportunities available.
Future Project Ideas
When exploring future project ideas for your Raspberry Pi cybersecurity lab, consider the myriad of advanced security measures you can implement.
These projects can align with current cybersecurity trends, enhancing your skills in ethical hacking and vulnerability assessments. Here are four innovative ideas:
- VPN and Encryption Setup: Implement a VPN like WireGuard to secure remote connections and encrypt data transmissions, ensuring anonymity and protection against interception.
- Intrusion Detection System (IDS): Deploy Snort or Suricata on your Raspberry Pi to monitor network traffic, detect anomalies, and integrate with your threat intelligence tools for real-time alerts.
- Raspberry Pi Honeypot: Create a honeypot to attract potential attackers, analyze their tactics, and divert them from critical systems, contributing to your digital forensics skills.
- AI-Based Anomaly Detection: Integrate AI tools to automate threat detection processes, using machine learning algorithms for predictive analysis of security threats, thereby enhancing your incident response capabilities.
These projects not only deepen your understanding of security frameworks but also prepare you for the evolving landscape of cybersecurity challenges.
Frequently Asked Questions
Can I Use Any Model of Raspberry Pi for This Lab?
While you can use various Raspberry Pi models, newer ones like the Raspberry Pi 4 excel in running cybersecurity tools efficiently. Their enhanced capabilities support more demanding tasks, ensuring better performance for your cybersecurity projects.
What Is the Cost of Setting up a Raspberry Pi Cybersecurity Lab?
Setting up your cybersecurity lab is like crafting a digital fortress. With budget considerations, you can explore various equipment options, typically ranging from $75 for basic setups to $300 for more advanced configurations, ensuring innovative protection.
How Do I Secure My Raspberry Pi from External Attacks?
To secure your Raspberry Pi from external attacks, implement robust firewall configurations and utilize secure connections like SSH and VPNs. Regularly update software and monitor traffic for anomalies to enhance your device’s security posture.
Can I Run Multiple Services Simultaneously on One Raspberry Pi?
Sure, you can run multiple services simultaneously on one Raspberry Pi—who needs resources anyway? Effective service management and clever resource allocation are essential to avoid performance degradation and guarantee stability in your ambitious projects.
What Troubleshooting Steps Should I Follow if My Lab Isn’t Working?
If your lab isn’t working, check network connectivity and verify software compatibility. Confirm all services are running, configurations are correct, and resources are adequate. Analyze logs for errors to troubleshoot effectively and enhance performance.
Conclusion
As you power down your Raspberry Pi after a productive session, the glow of the LED lights fades, leaving you with the satisfaction of newfound skills. Imagine a digital fortress, where you’re both the architect and the guardian, ready to defend against virtual threats. Each project you tackle sharpens your understanding, transforming your lab into a dynamic training ground. With every keystroke, you’re not just learning; you’re forging your path in the world of cybersecurity.

I am a retired software engineer with experience in a multitude of areas including managing AWS and VMWare development environments. I bought a relative a mini-PC a year ago and have become passionate about the technology and its potential to change how we deploy software.